How to Properly Check Engine Oil for Better Car Performance
Knowing how to properly check engine oil is one of the simplest yet most important car maintenance tasks you can do. This guide walks you through each step to ensure your engine stays healthy and runs smoothly. Regular oil checks help prevent costly repairs and keep your car performing at its best for years to come.
Your car’s engine is like its heart. And just like your heart needs blood to function, your engine needs oil to keep everything running smoothly. But how do you know if your engine has enough oil? Or if the oil you have is still good? The answer is simple: you need to check it yourself. Learning how to properly check engine oil is one of the most valuable skills any car owner can have. It takes just a few minutes and can save you from expensive repairs down the road.
Many people ignore their oil until something goes wrong. They might notice a warning light or hear strange noises from the engine. But by then, the damage could already be done. Regular oil checks help you catch problems early. They give you peace of mind and keep your car running strong. Whether you drive a brand-new vehicle or an older model, this simple habit can make a big difference. In this guide, we will walk you through everything you need to know about checking your engine oil the right way.
We will cover why oil matters, when to check it, and the step-by-step process. You will also learn how to read the dipstick, what the oil should look like, and when it is time for a change. By the end, you will feel confident tackling this basic maintenance task on your own. So let us dive in and take control of your engine health today.
Key Takeaways
- Check oil regularly: Make it a habit to inspect your oil level and quality at least once a month.
- Use the right tools: A clean rag and your car’s dipstick are all you need for a proper check.
- Timing matters: Always check oil when the engine is cool or has been off for a few minutes.
- Watch for warning signs: Low oil or dirty oil can lead to serious engine damage if ignored.
- Follow manufacturer guidelines: Stick to your owner’s manual for oil type and change intervals.
- Don’t overfill: Too much oil can be just as harmful as too little.
📑 Table of Contents
Why Checking Your Engine Oil Matters
Engine oil does more than just lubricate moving parts. It also cleans, cools, and protects your engine from wear and tear. Over time, oil breaks down and loses its effectiveness. Dirty oil cannot do its job properly. This is why regular checks are so important.
How Oil Keeps Your Engine Running
Think of oil as the lifeblood of your engine. It reduces friction between metal parts that move against each other. Without enough oil, those parts would grind together and cause damage. Oil also carries heat away from hot components. This helps prevent engine overheating, which can be a serious problem.
Clean oil also traps tiny particles of dirt and debris. Your oil filter catches these particles and keeps them from circulating through the engine. But filters can only do so much. Over time, oil becomes contaminated and loses its cleaning power. This is why you need to check both the level and the condition of your oil.
The Cost of Ignoring Oil Maintenance
Skipping oil checks can lead to big problems. Low oil levels increase friction and heat inside the engine. This can cause parts to wear out faster. In worst-case scenarios, a lack of oil can cause a complete engine failure. Rebuilding or replacing an engine costs thousands of dollars.
On the other hand, keeping up with your oil is much cheaper. A simple oil change costs a fraction of what an engine repair would cost. Regular oil checks help you stay on top of your maintenance schedule. They also help you spot leaks or other issues before they become serious.
Some people wonder if they can run diagnostics without a check engine light to detect oil issues. While diagnostic tools are helpful, they cannot replace a simple visual oil check. The dipstick tells you exactly what you need to know about your oil level and condition.
When and How Often Should You Check Your Oil?
Not everyone agrees on how often to check oil. The answer depends on your vehicle, your driving habits, and your environment. But one thing is clear: you should check your oil more often than you probably think.
Manufacturer Recommendations
Most car manufacturers recommend checking oil at least once a month. Some newer vehicles have electronic oil life indicators that tell you when it is time for a change. However, these systems are not perfect. They do not tell you about your current oil level or condition between changes.
Your owner’s manual is the best place to start. It will tell you the recommended oil type and change interval for your specific vehicle. For example, some cars need an oil change every 5,000 miles. Others can go 7,500 or even 10,000 miles between changes. Knowing your vehicle’s oil capacity and requirements helps you stay on track.
Driving Conditions That Affect Oil
Your driving habits also play a role. If you drive in stop-and-go traffic often, your oil may break down faster. Short trips where the engine does not fully warm up can also cause oil to degrade more quickly. Extreme temperatures, both hot and cold, affect oil performance too.
If you frequently tow heavy loads or drive in dusty conditions, you may need to check your oil more often. These conditions put extra stress on your engine and can contaminate the oil faster. Checking your oil regularly helps you adjust your maintenance schedule based on real driving conditions.
Best Time to Check Oil
The best time to check your oil is when the engine is cool. This means checking it before you start the car in the morning. Alternatively, you can check it a few minutes after turning off the engine. This gives the oil time to drain back into the oil pan.
Never check oil while the engine is running. The oil is circulating and moving through the engine, which gives an inaccurate reading. Also, hot oil can splash and cause burns. Always wait a few minutes after turning off the engine before you check the level.
Step-by-Step Guide: How to Properly Check Engine Oil
Now that you understand why oil checks matter, let us walk through the process. Checking your oil is easy and only takes a few minutes. You do not need any special tools or mechanical experience.
Step 1: Gather Your Supplies
You will need just a few things before you start:
- A clean rag or paper towel
- Your car’s owner manual
- Your recommended oil type (for top-offs if needed)
- A level surface to park on
That is it. You do not need any fancy equipment. A simple rag is all you need to wipe the dipstick clean. Make sure you have the right oil on hand if you need to add more. Using the wrong oil viscosity can harm your engine.
Step 2: Park on a Level Surface
Find a flat, level surface to park your car. This ensures an accurate reading. If your car is parked on a slope, the oil will shift to one side. This can give you a false reading on the dipstick.
Turn off the engine and engage the parking brake. Let the car sit for a few minutes before you check the oil. This allows the oil to settle and drain back into the pan.
Step 3: Locate the Dipstick
Open the hood and find the dipstick. It usually has a brightly colored handle, often yellow or orange, that is easy to spot. The owner manual can help you locate it if you are unsure.
Some newer vehicles have electronic oil level sensors instead of traditional dipsticks. If your car has one, consult your manual for how to access the oil level reading. However, most vehicles still use the classic dipstick method.
Step 4: Pull and Clean the Dipstick
Grasp the dipstick handle and pull it straight out. Use your rag to wipe the end of the dipstick completely clean. You want to remove all the old oil so you can get an accurate reading.
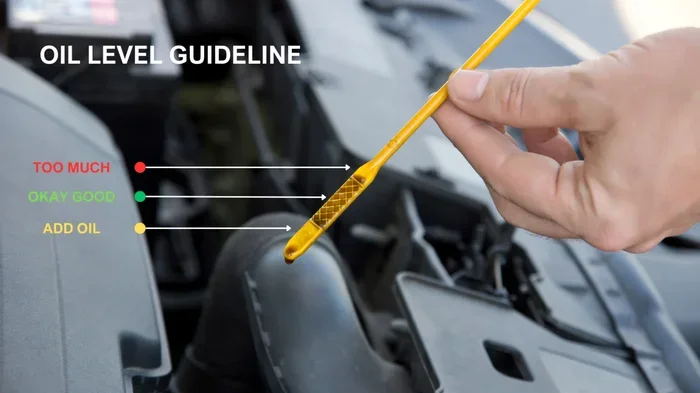
Pay attention to the markings on the dipstick. Most dipsticks have two lines, holes, or a crosshatched area. These indicate the minimum and maximum oil levels. The oil should fall between these marks.
Step 5: Reinsert and Pull Again
After wiping the dipstick clean, push it all the way back into its tube. Then pull it out again. This second reading gives you the most accurate measurement of your oil level.
Look at the oil on the end of the dipstick. Note where it falls between the marks. If the oil level is close to or below the minimum mark, you need to add oil. If it is at or near the maximum mark, you are in good shape.
Step 6: Check the Oil Condition
Checking the level is only half the job. You should also look at the condition of the oil. Fresh oil is typically amber or golden in color. As oil ages, it darkens and becomes gritty.
Rub a small amount of oil between your fingers. It should feel smooth, not gritty or rough. If the oil feels gritty, it has collected dirt and debris. If it looks very dark or black, it may be time for an oil change.
Also, check for any milky or frothy appearance. This could indicate coolant leaking into the oil, which is a serious problem. If you notice this, contact a mechanic right away. This could be a sign of a blown head gasket or other major issue.
Understanding Oil Levels and What They Mean
Once you have checked your oil, you need to understand what the readings mean. Not all oil levels are the same, and each situation calls for a different response.
Oil Level Too Low
If your oil level is below the minimum mark, you need to add oil right away. Driving with low oil can cause serious engine damage. The oil lubricates moving parts, and without enough of it, those parts can grind together and wear out quickly.
Add oil slowly and in small amounts. Use the type of oil recommended by your manufacturer. After adding a small amount, wait a minute and then check the level again. This prevents overfilling, which can be just as problematic as low oil.
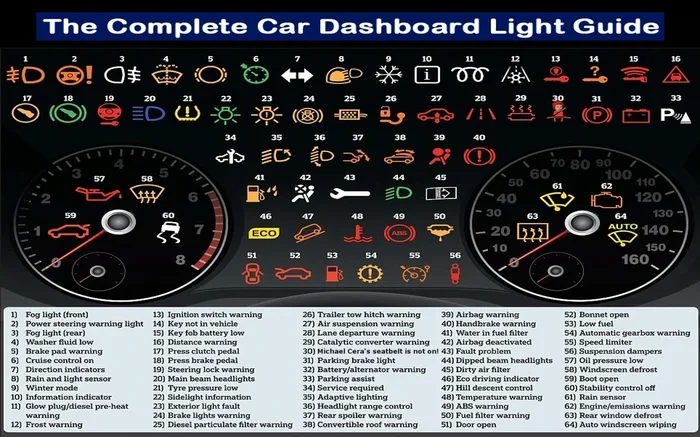
Low oil levels can also be a sign of an oil leak. If you find yourself needing to add oil frequently, have your car inspected for leaks. Ignoring a leak can lead to low oil pressure, which can cause your engine to seize up. You can also check if low engine oil shows on the dashboard as an early warning sign.
Oil Level Too High
Overfilling your engine with oil can cause problems too. Too much oil creates excess pressure inside the engine. This can lead to oil leaks or damage to engine seals and gaskets.
If you accidentally overfill, do not panic. You can carefully remove the excess oil using a suction tool or by draining some out. If you are unsure how to do this safely, visit a trusted mechanic. They can help you get the oil level back to the proper range.
Oil That Looks Dirty or Dark
Dark or dirty oil is a sign that it is time for a change. Over time, oil collects contaminants from the engine. These particles reduce the oil’s ability to lubricate and protect properly.
Do not wait too long to change dirty oil. Old, contaminated oil loses its viscosity and protective properties. This means it cannot keep your engine properly lubricated. Regular oil changes are one of the most important things you can do for your car’s longevity. Many drivers ask at what percent oil life should you change oil, and the general answer is when the indicator drops below 15 to 20 percent.
Common Oil Check Mistakes to Avoid
Even though checking oil is simple, many people make mistakes. Avoiding these common errors will help you get accurate readings and keep your engine healthy.
Checking Oil When the Engine Is Hot
One of the biggest mistakes is checking oil right after driving. Hot oil is thin and circulating through the engine. This gives you an inaccurate reading. Always wait a few minutes after turning off the engine before you check the oil.
Some manufacturers recommend checking oil with the engine warm but turned off. This is because warm oil drains better from the engine components back into the pan. Check your owner’s manual for the specific recommendation for your vehicle.
Not Reading the Dipstick Properly
Another common mistake is misreading the dipstick. Make sure you hold the dipstick horizontally when reading it. Looking at it from an angle can give you a false reading. The oil line should be between the minimum and maximum marks.
Do not assume the oil level is fine just because it is above the minimum mark. Ideally, the oil should be close to the maximum mark for optimal performance. If it is consistently low, you may have a leak or burning oil issue.
Using the Wrong Oil Type
Not all oils are the same. Using the wrong oil viscosity can affect engine performance and protection. Thicker oil may not flow properly in cold weather, while thinner oil may not provide enough protection in hot conditions.
Always use the oil type recommended by your car manufacturer. You can find this information in your owner’s manual. If you are unsure, ask a trusted mechanic or check the oil cap under your hood. It often lists the recommended oil weight.
Skipping Oil Changes
Some people think that as long as the oil level is fine, they do not need to change it. This is not true. Oil breaks down over time and loses its effectiveness. Even if the level is correct, old oil cannot properly protect your engine.
Keep track of your mileage and oil change dates. Many modern cars have an oil life indicator that reminds you when it is time for a change. If your car does not have this feature, set a reminder to check and change your oil regularly. Skipping oil changes can cause overheating and serious engine damage over time.
When to Seek Professional Help
While checking your oil is a DIY task, there are times when you should seek professional help. Knowing when to call a mechanic can save you from bigger problems down the road.
Signs That Something Is Wrong
Pay attention to warning signs from your car. If you notice any of the following, it is time to see a mechanic:
- The oil warning light comes on
- You hear knocking or grinding noises from the engine
- Your oil smells burnt or has a strong odor
- The oil appears milky or frothy
- You need to add oil frequently
These symptoms can indicate serious issues like low oil pressure, internal leaks, or engine wear. Addressing them early can prevent costly repairs. You can also check if low oil shows on your dashboard as an early warning sign. Can a car overheat with low oil? Absolutely yes, and this is one of the most dangerous situations to ignore. Low oil reduces the lubrication and cooling capacity of the engine, leading to excessive heat buildup and potential catastrophic failure.
Regular Oil Changes at a Dealership or Shop
While you can check your oil at home, oil changes are best left to professionals if you are not comfortable doing them yourself. A qualified technician can also inspect other fluid levels and components during the service.
If you own a Toyota or Lexus, you might wonder if you can get an oil change anywhere. The good news is that you can get an oil change at various shops, not just at the dealership. This gives you more flexibility and options for maintaining your vehicle. Always use the recommended oil type and oil filter for your specific make and model.
For those with a Subaru, always use genuine Subaru coolant and follow the manufacturer’s maintenance schedule. Using the right fluids and parts helps ensure your engine stays healthy and performs well for years to come. Proper oil maintenance is the foundation of a long-lasting, reliable vehicle.
Conclusion
Learning how to properly check engine oil is a simple yet powerful way to take care of your car. It only takes a few minutes each month and can save you from expensive repairs. By following the steps in this guide, you can keep your engine healthy and your car running smoothly for years to come.
Remember to check your oil regularly, use the right type of oil, and watch for warning signs of trouble. If something does not look or smell right, do not hesitate to seek professional help. Your engine is the heart of your car, and proper oil maintenance is the best way to keep it beating strong.
Make oil checks a part of your regular car maintenance routine. Pair this habit with other important tasks like monitoring your tire pressure and staying on top of fluid changes. Small efforts like these add up to big savings and a longer-lasting vehicle. Start today, and your future self will thank you.
Frequently Asked Questions
How often should I check my engine oil?
You should check your engine oil at least once a month. However, if you drive in harsh conditions or have an older vehicle, checking it every two weeks is a good idea. Regular checks help you catch low oil levels or contamination early before they cause engine damage.
Can I check my oil while the engine is running?
No, you should never check your oil while the engine is running. The oil is circulating and moving through the engine, which gives an inaccurate reading. Always turn off the engine and wait a few minutes before checking the oil level on the dipstick.
What color should my engine oil be?
Fresh engine oil is typically amber or golden in color. As it ages, it darkens to a brown or black color. If your oil looks milky or frothy, this could indicate a serious problem like coolant mixing with the oil. In that case, you should have a mechanic inspect your car right away.
Can low oil cause my engine to overheat?
Yes, low oil can definitely cause your engine to overheat. Oil lubricates the moving parts and helps carry heat away from critical components. When oil levels are too low, friction increases and heat builds up, which can lead to serious engine damage if not addressed quickly.
What is the difference between synthetic and conventional oil?
Synthetic oil is engineered in a lab to provide superior protection and performance. It lasts longer and handles extreme temperatures better than conventional oil. Conventional oil is derived from crude oil and is more affordable but requires more frequent changes. Check your owner’s manual to see which type your vehicle needs.
How do I know if I need to add oil or change it entirely?
If your oil level is low but the oil looks clean and amber-colored, you likely just need to top off. If the oil is dark, gritty, or smells burnt, it is time for a full oil change. Regular oil changes keep your engine properly lubricated and prevent long-term damage.