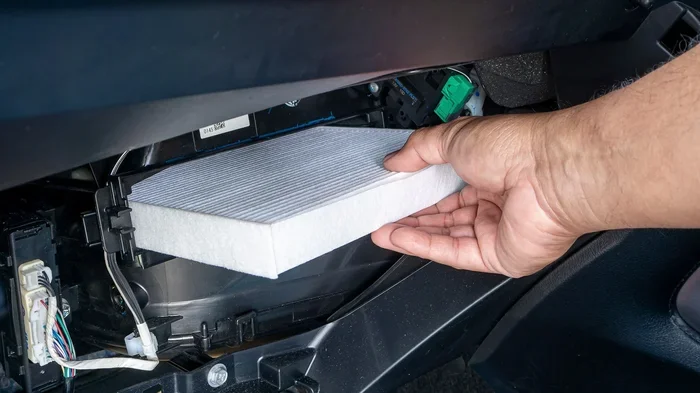
Can I Replace My Car AC Filter Myself Without Stress
Yes, you can replace your car AC filter yourself without any mechanic visits or expensive shop fees. This simple DIY task takes under 15 minutes and saves you money while keeping your car’s air fresh. Replacing a dirty car AC filter improves air quality, boosts cooling power, and protects your AC system from damage.
Have you ever walked into your car on a hot summer day and turned on the AC, only to feel warm air blowing back at you? It is frustrating. You might assume the problem is a major mechanical issue or a costly repair. But more often than not, the culprit is something simple. A dirty cabin air filter is blocking airflow and making your AC work harder than it should.
The good news is that you do not need to visit a mechanic or spend hundreds of dollars to fix this. You can replace your car AC filter yourself without stress. That is right. This is one of the easiest and most satisfying DIY car maintenance tasks you can do. Whether you are a complete beginner or someone who has never touched the inside of their car, this guide will walk you through every single step.
In this article, we will cover everything you need to know. We will talk about what a car AC filter does, why it matters, where to find it, and exactly how to swap it out in your own driveway. We will also share common mistakes to avoid, tips for choosing the right replacement filter, and answers to the most frequently asked questions. By the end, you will feel confident enough to grab a new filter and get the job done today.
Key Takeaways
- Easy DIY Task: Most car owners can swap out their AC filter in minutes using basic tools found at home.
- Saves Money: Doing it yourself eliminates labor costs, and replacement filters are affordable.
- Better Air Quality: A clean cabin air filter removes dust, pollen, and allergens from your car’s interior.
- Improved AC Performance: A fresh filter allows better airflow, making your air conditioning work more efficiently.
- Know Your Location: The filter is usually behind the glove box or under the dashboard, and the guide covers how to find it.
- Regular Replacement Matters: Changing the filter every 12,000 to 15,000 miles keeps your car running smoothly.
- No Special Skills Needed: If you can open a glove box, you have what it takes to complete this job.
📑 Table of Contents
- What Is a Car AC Filter and Why Does It Matter?
- Can I Replace My Car AC Filter Myself Without Stress?
- Step-by-Step Guide to Replacing Your Car AC Filter
- How Often Should You Replace Your Car AC Filter?
- Choosing the Right Replacement AC Filter
- Common Mistakes to Avoid When Replacing Your AC Filter
- Expert Insights: Why This Simple Job Makes a Big Difference
- Key Takeaways
- Conclusion
What Is a Car AC Filter and Why Does It Matter?
Before we dive into the replacement process, let us understand what we are working with. The car AC filter, also known as a cabin air filter, is a small but important part of your vehicle’s air conditioning system. It sits behind the glove box or under the dashboard and cleans the air that flows into your car’s interior.
Think of it like the filter in your home HVAC system. It catches dust, pollen, dirt, mold spores, and even tiny particles from exhaust fumes. Without it, all of those pollutants would blow directly into your face every time you turned on the fan. Not exactly something you want to breathe in during your daily commute.
How the AC Filter Protects Your Health
Your car’s cabin air filter plays a huge role in the air quality inside your vehicle. When the filter is clean, it traps allergens, dust mites, and other airborne particles. This is especially important for people with asthma, allergies, or sensitive respiratory systems. A dirty filter, on the other hand, can actually make things worse. It becomes a breeding ground for mold and bacteria. Then instead of cleaning the air, it spreads contaminants throughout the cabin.
How a Clean Filter Boosts AC Performance
Beyond health benefits, a clean car air filter directly impacts how well your AC system works. When the filter gets clogged with debris, it restricts airflow. Less airflow means weaker cooling. Your AC compressor has to work overtime to compensate, which can lead to overheating and premature wear. Replacing the filter regularly keeps the airflow strong and the cooling efficient.
Here are some clear signs that your cabin air filter needs attention:
- Weak airflow from the vents, even on the highest setting
- Unusual odors coming from the AC, like mustiness or a musty smell
- Increased allergy symptoms inside the car
- Visible dust or debris coming out of the vents
- Reduced fuel efficiency because the AC system is working harder
If you have noticed any of these issues, it is time to check your filter. And the best part? You can do it yourself.
Can I Replace My Car AC Filter Myself Without Stress?
The short answer is absolutely yes. Replacing a car AC filter is one of the simplest maintenance tasks you will ever do. Most vehicles make it incredibly easy to access the filter. You do not need special tools, advanced mechanical knowledge, or a trip to the auto shop. In many cases, you can complete the entire job in less than fifteen minutes.
People often avoid DIY car maintenance because they fear making a mistake. They worry about breaking something or doing it wrong. But swapping out a cabin air filter is about as foolproof as car maintenance gets. There are only a few steps, and we will walk you through each one in detail. Thousands of car owners do this every single week, and so can you.
Tools and Materials You Will Need
One of the reasons this task is so easy is that you need very few things. Here is what you should have ready before you start:
- Your new cabin air filter — make sure it matches your vehicle’s make, model, and year
- A screwdriver — usually a Phillips head, though some models use a flathead
- A pair of gloves — optional but helpful for keeping your hands clean
- A flashlight — useful if the filter area is dark or hard to see
- A vacuum or soft brush — to clean out any debris before installing the new filter
That is it. No expensive equipment. No complicated instructions. Just a new filter and a few basic household items.
Step-by-Step Guide to Replacing Your Car AC Filter
Now let us get into the actual process. Follow these steps carefully, and you will have a fresh AC filter in no time.
Step 1: Park Your Car and Turn Off the Engine
Find a flat, safe surface to park on. Turn off the engine and let the car cool down for a few minutes. You do not want to work on a hot engine or in direct sunlight if possible. Open the hood or head to the cabin area depending on where your filter is located.
Step 2: Locate the Cabin Air Filter
The most common location for the cabin air filter is behind the glove box. In some vehicles, it may be under the dashboard on the passenger side or behind a panel near the firewall. Check your owner’s manual for the exact location. If you do not have the manual, a quick online search for your car’s make and model will show you where it is.
For most cars, you will need to remove the glove box to access the filter compartment. Some vehicles have a clip or a screw holding it in place. Others have a simple latch that releases with a gentle push.
Step 3: Remove the Old Filter
Once you have access to the filter compartment, slide the old filter out carefully. Pay attention to which direction the airflow arrow is pointing. The arrow should face toward the AC system — usually toward the front of the car. Note this orientation so you install the new filter correctly.
Take a moment to look at the old filter. If it is dark gray, black, or covered in debris, it is definitely time for a replacement. A clean filter should be a light beige or white color.
Step 4: Clean the Filter Compartment
Before inserting the new filter, use your vacuum or soft brush to clean out any dust or debris inside the compartment. This small step makes a big difference. It prevents leftover particles from getting trapped against the new filter and ensures optimal airflow from the start.
Step 5: Insert the New Filter
Take your new cabin air filter out of its packaging. Match the airflow direction arrow to the correct orientation — the arrow should point toward the AC system. Slide the filter gently into the compartment. Make sure it sits snugly and evenly in place. Do not force it. If it does not fit easily, double-check that you have the right filter size.
Step 6: Reassemble and Test
Put the glove box back in place or reattach any panels you removed. Make sure all clips and screws are secure. Start the car and turn on the AC at full blast. Listen for any unusual noises and check that the airflow feels strong and cool. If everything sounds and feels normal, congratulations — you just replaced your car AC filter yourself without stress.
How Often Should You Replace Your Car AC Filter?
Knowing how to replace the filter is only half the battle. You also need to know how often to do it. Most manufacturers recommend replacing the cabin air filter every 12,000 to 15,000 miles, or at least once a year. However, your driving conditions can change this timeline.
If you drive in a dusty area, on unpaved roads, or in heavy traffic frequently, your filter will clog faster. The same goes for people who live in areas with high pollen counts or lots of air pollution. In those cases, you may want to check the filter every six months and replace it more often.
Here is a simple way to remember: check the filter at every oil change. If it looks dirty, swap it out. If it still looks clean, leave it be. This habit keeps your AC system running at peak performance year-round.
Signs Your Filter Needs Replacing Sooner
Even if you have not hit the mileage mark, watch for these warning signs:
- The air from your vents feels weaker than usual
- You notice a strange smell when the AC runs
- You see dust coming out of the vents
- Your allergy symptoms increase while driving
- You have driven more than 15,000 miles since the last replacement
Catching these signs early prevents bigger problems down the road. A neglected dirty filter can strain the AC blower motor and lead to expensive repairs. Staying on top of your car maintenance schedule saves you both time and money.
Choosing the Right Replacement AC Filter
Not all cabin air filters are the same. Choosing the right one for your vehicle ensures a perfect fit and the best filtration performance. Here are some tips to help you make the right choice.
Check Your Owner’s Manual
Your owner’s manual is your best friend when it comes to finding the correct filter. Look up the recommended filter type and size. This information is usually found in the maintenance section. If you have lost your manual, you can find the details online by searching for your vehicle’s year, make, and model.
OEM vs. Aftermarket Filters
You have two main options when buying a replacement filter. OEM filters are made by the same manufacturer that built your car. They are designed to meet the exact specifications of your vehicle. Aftermarket filters are made by third-party companies and are often more affordable. Many aftermarket filters perform just as well as OEM options. Brands like Fram, Mann-Filter, and Bosch are well-regarded in the car maintenance community.
Activated Carbon vs. Standard Filters
Some cabin air filters come with activated carbon layers. These filters do a better job of removing odors, exhaust fumes, and harmful gases from the air. If you live in a city with heavy traffic or have sensitivities to smells, an activated carbon filter is a worthwhile upgrade. Standard particulate filters are still effective at catching dust and pollen but do not address gases and odors as well.
| Filter Type | Best For | Price Range |
|---|---|---|
| Standard Particulate | Basic dust and pollen protection | $5 – $15 |
| Activated Carbon | Odor removal and gas filtration | $10 – $25 |
| HEPA-Style | Maximum particle capture for allergy sufferers | $15 – $30 |
Whatever type you choose, make sure it fits your vehicle correctly. A filter that is too small or too large will not seal properly and will let unfiltered air bypass the filtration layer.
Common Mistakes to Avoid When Replacing Your AC Filter
Even though this is a simple task, mistakes can happen. Here are the most common errors people make and how to avoid them.
Forgetting to Check the Airflow Direction
Every cabin air filter has an airflow arrow printed on the frame. Installing the filter backward restricts airflow and reduces AC performance. Always make sure the arrow points toward the AC system, not away from it. This is the single most common mistake people make, and it is so easy to avoid.
Using the Wrong Filter Size
Not all filters fit all cars. Using the wrong size can leave gaps that let unfiltered air into the cabin. It can also put pressure on the filter housing and cause damage. Always double-check the part number before purchasing. When in doubt, bring the old filter with you to the auto parts store and ask for a match.
Skipping the Cleaning Step
Many people pull out the old filter and immediately insert the new one. But the filter compartment itself may be full of dust and debris. Taking a few extra seconds to clean it out ensures that the new filter starts fresh and performs at its best.
Neglecting Regular Replacement
The biggest mistake of all is simply forgetting to replace the filter. A clean filter that has been in place for too long becomes saturated and loses its effectiveness. Set a reminder on your phone or mark your calendar. Consistent maintenance is the key to a long-lasting AC system.
Expert Insights: Why This Simple Job Makes a Big Difference
Automotive experts consistently rank cabin air filter replacement as one of the most overlooked yet impactful maintenance tasks. A clean filter does not just improve your comfort. It protects the entire AC system. When airflow is restricted, the blower motor works harder. Over time, this extra strain leads to motor failure. Replacing a filter that costs between ten and twenty-five dollars can prevent a blower motor replacement that costs several hundred dollars.
Mechanics also point out that during routine car maintenance, the AC filter is often the first thing to check. It is quick, easy, and inexpensive. If you are already doing oil changes and tire rotations, adding a filter check to your routine takes almost no extra time.
Another expert tip: if you buy your replacement filter in bulk, you can save even more money. Many auto parts stores and online retailers offer multi-packs at a discount. Keeping a spare filter in your garage means you are always ready when the time comes to swap it out.
Key Takeaways
- Easy DIY Task: Most car owners can swap out their AC filter in minutes using basic tools found at home.
- Saves Money: Doing it yourself eliminates labor costs, and replacement filters are affordable.
- Better Air Quality: A clean cabin air filter removes dust, pollen, and allergens from your car’s interior.
- Improved AC Performance: A fresh filter allows better airflow, making your air conditioning work more efficiently.
- Know Your Location: The filter is usually behind the glove box or under the dashboard, and the guide covers how to find it.
- Regular Replacement Matters: Changing the filter every 12,000 to 15,000 miles keeps your car running smoothly.
- No Special Skills Needed: If you can open a glove box, you have what it takes to complete this job.
Conclusion
Replacing your car AC filter yourself is one of the easiest, most rewarding things you can do as a car owner. It costs just a few dollars, takes less than fifteen minutes, and delivers immediate results. Stronger airflow, cooler air, better air quality, and a healthier AC system are all waiting for you on the other side of this simple job.
You do not need to be a mechanic. You do not need expensive tools. You just need a new filter, a screwdriver, and the confidence to open your glove box. Now that you have this complete guide, there is no reason to put it off. Grab a replacement cabin air filter today, follow the steps in this article, and enjoy the satisfaction of a job well done.
Your car, your wallet, and your lungs will all thank you. Take charge of your car maintenance and make can I replace my car AC filter myself the next item on your to-do list. You will wonder why you did not do it sooner.
Frequently Asked Questions
How long does it take to replace a car AC filter?
For most vehicles, the entire process takes between five and fifteen minutes. Once you know where the filter is and how to access it, you will be able to do it even faster the next time.
Where is the car AC filter located?
The cabin air filter is typically located behind the glove box or under the dashboard on the passenger side. Some vehicles may have it accessible through the engine bay. Check your owner’s manual for the exact location in your car.
How much does a car AC filter cost?
Most cabin air filters cost between five and twenty-five dollars. Activated carbon filters and premium options may cost a bit more, but they are still far cheaper than paying a mechanic to do the job for you.
Can a dirty AC filter affect my car’s cooling system?
Yes, absolutely. A clogged filter restricts airflow, which reduces cooling performance. Over time, the extra strain can cause the AC blower motor to overheat and fail. Regular replacement prevents these issues.
Do I need any special tools to replace my AC filter?
No special tools are needed in most cases. A basic screwdriver is usually sufficient. Some vehicles have clips or latches that require no tools at all. A flashlight and a soft brush are helpful extras but not required.
How often should I replace my cabin air filter?
The general recommendation is every 12,000 to 15,000 miles or once a year. However, if you drive in dusty conditions or areas with high pollution, you may need to replace it more frequently. Checking the filter at every oil change is a great habit to build.