Is Changing a Headlight Easy Here Is Everything You Need
Is changing a headlight easy? Yes, it is one of the simplest car maintenance tasks you can do at home. With the right tools and a few minutes of your time, you can swap out a dead headlight bulb and restore safe nighttime driving. This guide walks you through every step, from choosing the correct bulb to avoiding common mistakes.
Have you ever driven home at night and noticed one of your car headlights is out? It is a scary and frustrating experience. You wonder, is changing a headlight easy? The short answer is yes. Replacing a headlight bulb is one of the easiest vehicle maintenance tasks you can do. You do not need to be a mechanic. You do not need expensive tools. In most cases, you can finish the job in under 30 minutes right in your driveway.
Many people pay a mechanic $50 to $150 to change a headlight. But the truth is, you can save that money and learn a useful skill at the same time. This guide covers everything you need to know. We will talk about the different types of headlight bulbs. We will go through the tools you need. We will walk you through the step-by-step process. And we will highlight the most common mistakes to avoid. By the end, you will feel confident to tackle this simple auto repair task on your own.
Key Takeaways
- Changing a headlight is easy: Most vehicles allow you to replace a headlight bulb in under 30 minutes with basic tools.
- Know your bulb type: Halogen, LED, and xenon bulbs are the three main types, and each has a different replacement process.
- Safety first: Always disconnect the battery and let the headlight cool before starting the replacement.
- Avoid common mistakes: Touching the glass with bare hands and skipping the alignment check are the two most frequent errors.
- DIY saves money: A professional headlight replacement can cost $50 to $150, while doing it yourself costs only the price of the bulb.
- Check your warranty: Some newer vehicles may have headlight warranties that cover free replacement at a dealership.
📑 Table of Contents
- Why Headlights Matter for Road Safety
- Understanding Your Headlight Bulb Types
- Tools and Materials You Will Need
- Step-by-Step Guide to Changing a Headlight
- Common Mistakes to Avoid During Headlight Replacement
- When Should You Seek Professional Help?
- How to Extend the Life of Your Headlights
- Frequently Asked Questions About Headlight Replacement
- Final Thoughts: Is Changing a Headlight Easy?
Why Headlights Matter for Road Safety
Headlights do more than help you see the road at night. They let other drivers see your vehicle. A burned-out headlight is not just an inconvenience. It is a safety hazard. In many states, driving with a broken headlight can lead to a traffic ticket. It can also cause your car to fail a safety inspection.
Modern car headlights have come a long way. Older vehicles used simple halogen bulbs. Newer cars may use LED or xenon technology. Each type has its own benefits. But no matter which kind your vehicle uses, keeping both headlights working is essential. Good headlight maintenance also extends the life of your headlight assembly. It keeps your visibility sharp and your night driving safe.
The Role of Headlights in Nighttime Driving
When you drive at night, your headlights are your primary source of light. They illuminate the road ahead. They help you spot obstacles, animals, and pedestrians. A single burned-out bulb cuts your visibility in half. This puts you and everyone else on the road at risk. That is why fixing a dead headlight quickly matters so much.
Legal Requirements for Working Headlights
Every state requires vehicles to have functioning headlights. Police officers can pull you over for a burned-out bulb. The fine varies by location. But beyond the fine, a broken headlight can cause problems during vehicle inspections. Keeping your headlights in good shape keeps you legal and safe on the road.
Understanding Your Headlight Bulb Types
Before you start the replacement process, you need to know what kind of bulb your vehicle uses. Not all headlight bulbs are the same. Using the wrong bulb can damage your headlight housing or cause poor visibility. Let us look at the three most common types.
Halogen Bulbs
Halogen bulbs are the most traditional type of headlight bulb. They have been used in cars for decades. They are affordable and easy to find. Most older and many mid-range vehicles still use halogen bulbs. They produce a warm yellowish light. Replacing a halogen bulb is usually the simplest process of all three types.
LED Bulbs
LED bulbs are becoming more popular in newer vehicles. They produce a bright white light. They use less energy than halogen bulbs. LED bulbs last much longer. However, replacing an LED bulb can be more complex. Some LED setups are built into the headlight assembly and may require professional help.
Xenon (HID) Bulbs
Xenon bulbs, also known as HID bulbs, produce a very bright blue-white light. They are common in luxury vehicles. Xenon bulbs require a ballast to operate. Replacing them involves more steps than halogen bulbs. If your vehicle uses xenon headlights, you may want to consult your owner manual before starting the replacement.
How to Find the Right Bulb for Your Vehicle
The easiest way to find the correct bulb is to check your vehicle owner manual. You can also look up your vehicle by make, model, and year online. Many auto parts stores offer free lookup tools. Enter your vehicle details, and they will tell you the exact bulb size and type you need.
| Bulb Type | Average Lifespan | Typical Cost | Difficulty to Replace |
|---|---|---|---|
| Halogen | 450-1,000 hours | $5-$20 | Easy |
| LED | 10,000-30,000 hours | $20-$100 | Moderate |
| Xenon (HID) | 2,000-3,000 hours | $30-$150 | Moderate to Hard |
Tools and Materials You Will Need
One of the best things about changing a headlight is that you need very few tools. Most people already have everything at home. Here is a simple list of what you will need before you start the headlight replacement process.
- Replacement bulb: Make sure it matches your vehicle. Buy from a reputable brand for best results.
- Screwdriver set: A basic Phillips and flat-head set will cover most vehicles.
- Rubber gloves: These protect the new bulb from oil on your fingers. Oils on the glass can cause hot spots and shorten bulb life.
- Clean cloth or paper towel: Use this to handle the bulb safely.
- Flashlight: You may need extra light to see inside the engine bay.
- Owner manual: This is your best resource for locating the bulb and connector.
That is it. You do not need any special equipment. No expensive diagnostic tools. No mechanic-grade gear. Just a few simple items and about 20 to 30 minutes of your time.
Step-by-Step Guide to Changing a Headlight
Now let us get into the actual process. Is changing a headlight easy when you follow the right steps? Absolutely. Here is a clear, simple walkthrough that works for most vehicles.
Step 1: Park Your Vehicle Safely
Find a flat, level surface to park on. Turn off the engine and let the vehicle cool down. Headlights can get very hot during use. Wait at least 10 to 15 minutes before you start working. This prevents burns and keeps you safe.
Step 2: Locate the Headlight Bulb
Open the hood and find the back of the headlight assembly. The bulb sits behind a plastic or rubber cover. Your owner manual will show you exactly where to look. In most vehicles, you will find the bulb assembly near the top of the engine bay, close to the front of the car.
Step 3: Disconnect the Battery
This is an important safety step. Before touching any electrical components, disconnect the negative battery terminal. Use a wrench to loosen the clamp. Pull the cable off the battery post. This prevents any electrical shorts while you work on the headlight wiring.
Step 4: Remove the Old Bulb
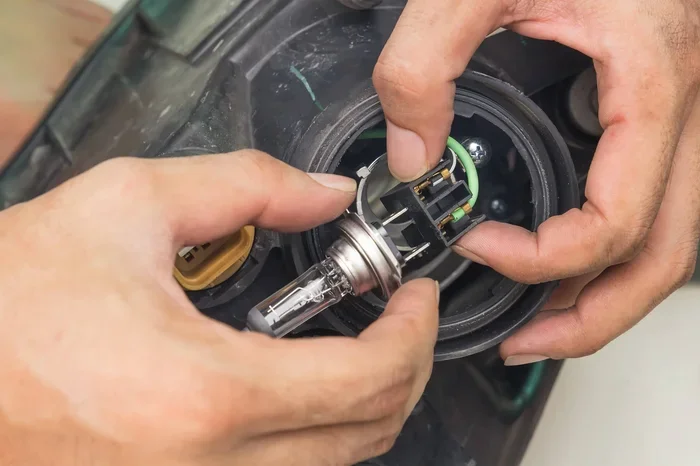
Remove the plastic or rubber cover behind the headlight assembly. You may need to twist it counterclockwise or press a clip to release it. Next, disconnect the electrical connector from the bulb. Gently pull it straight out. Do not yank or force it. Now release the retaining clip or spring that holds the bulb in place. Carefully pull the old bulb straight out. Do not twist it.
Step 5: Install the New Bulb
Put on your rubber gloves before handling the new bulb. Never touch the glass part of the bulb with your bare fingers. Oils from your skin can create hot spots that cause the bulb to fail early. Hold the bulb by the base or the plastic housing. Insert the new bulb into the socket. Make sure it sits firmly in place. Reattach the retaining clip or spring. Reconnect the electrical connector. Replace the rubber or plastic cover.
Step 6: Test the New Headlight
Before you close everything up, test the new bulb. Reconnect the battery. Turn on your vehicle. Switch on the headlights. Check both the low beam and high beam. Make sure the new bulb lights up properly. If it does not work, double-check the connector and the bulb seating.
Step 7: Check Headlight Alignment
After installing a new bulb, it is a good idea to check the alignment. Park your vehicle about 25 feet from a flat wall. Turn on the headlights. Look at the beam pattern on the wall. The light should be level and aimed slightly to the right (in right-hand driving countries). If the beam is too high or too low, you may need to adjust the headlight alignment screws on the assembly.
Quick Tips for a Smooth Headlight Replacement
- Always wear rubber gloves when handling the new bulb.
- Take a photo of the old bulb setup before you remove it. This helps during reassembly.
- Buy a spare bulb to keep in your trunk. You never know when you will need it.
- Clean the headlight cover with a mild cleaner before you start. This gives you better visibility inside the engine bay.
- Work on one headlight at a time. This ensures you do not mix up the steps.
Common Mistakes to Avoid During Headlight Replacement
Even though changing a headlight is simple, people still make mistakes. Knowing what to avoid saves you time and frustration. Here are the most common errors people make during headlight replacement.
Touching the New Bulb with Bare Hands
This is the number one mistake. The oils from your skin leave a residue on the glass. When the bulb heats up, this residue creates hot spots. Hot spots can cause the bulb to crack or burn out much faster than it should. Always use rubber gloves or a clean cloth when handling the new bulb.
Forcing the Connector
The electrical connector can be tight. Some people try to pull it out with too much force. This can damage the connector or the wiring. If the connector does not come out easily, check for a locking tab. Press or release the tab before pulling gently.
Forgetting to Check the Fuse
If your new bulb does not work, the problem may not be the bulb. It could be a blown headlight fuse. Check your owner manual for the fuse box location. Inspect the headlight fuse before assuming the bulb is defective.
Skipping the Alignment Check
A new bulb can shift slightly during installation. If you do not check the alignment, your headlights may aim too high or too low. Misaligned headlights reduce your visibility and can blind oncoming drivers. Always do a quick alignment check after replacement.
Using the Wrong Bulb Type
Not all bulbs fit all vehicles. Using the wrong bulb type can cause poor light output, overheating, or even damage to the headlight housing. Always double-check the bulb type and size before you purchase a replacement.
When Should You Seek Professional Help?
Most headlight replacements are simple DIY jobs. But there are times when you should let a professional handle it. If your vehicle uses integrated LED assemblies, replacing the bulb may not be straightforward. Some modern vehicles have sealed headlight units that require specialized tools. If you feel unsure at any point, it is perfectly fine to visit a trusted auto repair shop. They can complete the job quickly and correctly.
Also, if you notice moisture inside the headlight housing, you may have a cracked seal. This is not a bulb issue. It requires a different kind of repair. In this case, professional help is the best choice. A mechanic can inspect the housing, replace any damaged seals, and ensure your headlights are watertight.
How to Extend the Life of Your Headlights
Once you have replaced your headlight, you want it to last as long as possible. Here are some simple tips to keep your headlights bright and functioning well for years to come.
- Clean your headlights regularly: Dirt and grime reduce light output. Use a mild soap and a soft cloth to clean the outer cover.
- Replace bulbs in pairs: If one bulb burns out, the other is likely close behind. Replacing both at the same time ensures consistent lighting.
- Check your wiring: Frayed or corroded wires can cause flickering or dim headlights. Inspect the wiring around the headlight connector periodically.
- Avoid touching the glass: This applies to both new and old bulbs. Always handle bulbs by the base.
- Check the headlight fuse during routine maintenance: A quick fuse check can prevent a burned-out headlight from catching you off guard.
Taking care of your headlights is part of good car care habits. It is a small effort that pays off in safety and visibility. A few minutes of maintenance now can save you from bigger problems later.
Frequently Asked Questions About Headlight Replacement
Can I change a headlight bulb myself?
Yes, changing a headlight bulb yourself is one of the easiest car maintenance tasks. Most vehicles allow you to access the bulb from the engine bay. You only need basic tools like a screwdriver and a pair of rubber gloves. The entire process usually takes 20 to 30 minutes. If you can change a light bulb in your house, you can change a car headlight bulb.
How much does it cost to replace a headlight bulb?
The cost of a replacement bulb ranges from $5 to $100 depending on the bulb type. Halogen bulbs are the cheapest. LED and xenon bulbs cost more. If you pay a mechanic to do the job, you will add $50 to $150 for labor. Doing it yourself saves you the labor cost entirely. That is why many car owners prefer the DIY approach to headlight replacement.
How long does a headlight bulb last?
Halogen bulbs typically last between 450 and 1,000 hours of use. LED bulbs can last 10,000 to 30,000 hours. Xenon bulbs fall in between at 2,000 to 3,000 hours. Your driving habits affect bulb life. Frequent nighttime driving shortens the lifespan. Using the correct bulb type and handling it properly helps maximize longevity.
Should I replace both headlight bulbs at the same time?
Yes, it is a good practice to replace both bulbs at the same time. Even if only one bulb has burned out, the other is likely near the end of its life. Replacing them together ensures both headlights produce the same brightness and color. This gives you balanced, safe visibility on the road.
Why is my new headlight bulb flickering?
A flickering new bulb is usually caused by a loose connection or a corroded headlight connector. Check that the connector is firmly seated. Inspect the bulb base for any corrosion. If the problem persists, the bulb may be defective. In rare cases, a faulty headlight fuse or relay can also cause flickering.
Do I need to realign my headlights after replacing the bulb?
It is a good idea to check the alignment after any headlight replacement. The new bulb may sit slightly differently in the socket. Misaligned headlights can blind other drivers and reduce your own visibility. A quick check against a flat wall can tell you if adjustment is needed. Most vehicles have adjustment screws on the back of the headlight assembly.
Final Thoughts: Is Changing a Headlight Easy?
So, is changing a headlight easy? The answer is a clear and confident yes. It is one of the most straightforward DIY car care tasks you can do. You do not need special skills. You do not need expensive tools. You just need the right bulb, a few basic items, and about half an hour of your time.
Changing your own headlight saves you money. It teaches you something new about your vehicle. And most importantly, it gets you back to safe nighttime driving quickly. Whether your vehicle uses halogen, LED, or xenon bulbs, the basic process is similar. Follow the steps, avoid the common mistakes, and you will be fine.
Do not let a burned-out headlight sit on your to-do list for weeks. Grab a replacement bulb, pop your hood, and get it done today. Once you complete your first headlight replacement, you will realize how simple and rewarding it can be. You will wonder why you ever paid someone else to do it.
Take pride in maintaining your vehicle. Every small job you handle yourself builds your confidence as a car owner. And a well-maintained vehicle keeps you safer on the road. So go ahead. Change that headlight. You have got this.