How Do You Get Stickers Off Windows Quickly And Safely
Discover the easiest and safest ways to remove stubborn stickers from your car windows without leaving residue or causing damage. Whether you are dealing with old bumper stickers or temporary decals, this guide covers every method you need. From heat and rubbing alcohol to commercial removers, we walk you through each step clearly. You will also learn how to clean up leftover adhesive and protect your glass. Say goodbye to ugly sticker marks for good.
You know that annoying feeling when you look at your car window and there it is, a big ugly sticker staring back at you. Maybe it is an old bumper sticker from a concert you went to years ago. Perhaps it is a dealership decal that you never bothered to take off. Or maybe it is a promotional sticker that your kids slapped on last summer. Whatever the reason, you want it gone, and you want it gone now.
But removing stickers from windows is not always as simple as peeling them off. The adhesive can cling to glass like it is glued there permanently. You end up with residue, streaks, and sometimes even scratches if you do it wrong. That is exactly why we put together this complete guide. Here, you will learn how do you get stickers off windows quickly, safely, and without damaging your car.
This article covers every method you could possibly need. We will talk about household items you already have in your kitchen. We will discuss professional-grade products that detailers swear by. And we will share tips that prevent damage so your windows stay crystal clear. By the time you finish reading, you will feel confident tackling any sticker on any window.
Key Takeaways
- Heat is your best friend: Using a hair dryer or heat gun softens the adhesive and makes sticker removal effortless.
- Household items work wonders: Things like rubbing alcohol, vinegar, and cooking oil can dissolve sticker glue safely.
- Always scrape gently: Use a plastic scraper or razor blade at the right angle to avoid scratching your glass.
- Residue cleanup matters: Sticky residue left behind can attract dirt and look terrible if not properly addressed.
- Prevention saves time: Applying paint protection film or removable adhesives makes future sticker removal a breeze.
- Patience pays off: Rushing the process can damage your windows or leave permanent marks behind.
- Multiple methods exist: If one approach does not work, another likely will, so keep trying safely.
📑 Table of Contents
- Why Stickers Are So Hard to Remove from Windows
- Supplies You Need for Sticker Removal
- Step-by-Step Methods to Remove Stickers from Windows
- How to Deal with Sticky Residue After Sticker Removal
- Tips to Prevent Damage to Your Car Windows
- When to Seek Professional Help for Sticker Removal
- How to Keep Your Windows Sticker-Free in the Future
- Common Mistakes People Make When Removing Stickers from Windows
- Frequently Asked Questions
- Final Thoughts
Why Stickers Are So Hard to Remove from Windows
Before we dive into the removal methods, it helps to understand what you are dealing with. Stickers are not just pieces of paper. They are a combination of paper or vinyl, ink, and a sticky adhesive layer designed to bond strongly to surfaces. Over time, that adhesive breaks down and bonds even more tightly to the glass. This is why old stickers feel like they are part of the window.
The Science Behind Adhesive Bonding
Adhesive manufacturers design sticker glue to resist moisture, heat, and friction. That is great when you want the sticker to stay put. But when you want it off, that same durability becomes your biggest enemy. The longer a sticker stays on a window, the deeper the adhesive seeps into tiny pores in the glass surface. This creates a stronger bond that requires more effort to break.
Temperature plays a huge role too. Cold weather makes adhesive brittle and harder to remove cleanly. Hot weather softens it but can also cause the sticker to smear. Understanding these factors helps you choose the right removal method and timing.
Common Types of Window Stickers
Not all stickers are created equal. Here are the most common types you will encounter on car windows:
- Bumper stickers: These have a strong outdoor-grade adhesive meant to withstand weather.
- Dealership decals: Often applied with temporary adhesive but can leave residue over time.
- Promotional stickers: Usually cheaper adhesive that comes off relatively easily.
- Temporary tattoos or decals: Designed to be removable but can still leave glue behind.
- Paint protection film markings: These are not traditional stickers but can be equally stubborn.
Knowing what type of sticker you are dealing with helps you pick the most effective removal method. A promotional sticker might come off with just warm water, while a bumper sticker might need more aggressive treatment.
Supplies You Need for Sticker Removal
Before you start peeling, scraping, or soaking, gather your supplies. Having everything ready makes the process smoother and faster. You do not want to stop halfway through because you are missing a key tool.
Household Items That Work
You might be surprised at how many common household items can help with sticker removal from windows:
- Rubbing alcohol: A powerful solvent that dissolves most adhesives without harming glass.
- White vinegar: A natural cleaner that breaks down sticker glue safely.
- Cooking oil or olive oil: Softens adhesive and makes it easy to wipe away.
- Dish soap: Helps cut through grease and residue when mixed with warm water.
- Baking soda: Creates a gentle abrasive paste for stubborn residue.
- Citrus-based cleaners: Natural degreasers that work wonders on adhesive.
- Warm water: The simplest tool for loosening sticker adhesive before scraping.
Professional-Grade Products
If household items do not do the job, you might want to try some dedicated products designed for sticky residue removal:
- Goo Gone: A popular adhesive remover that works on most sticker glues.
- WD-40: Great for penetrating and dissolving tough adhesive bonds.
- Adhesive remover wipes: Convenient and pre-measured for easy application.
- Plastic razor blades: Safe for glass and much less risky than metal blades.
- Heat gun: Provides concentrated heat for loosening old, stubborn stickers.
- Microfiber cloths: Essential for wiping away residue without scratching glass.
Having a mix of household and professional supplies gives you options. Start with the gentlest method and work your way up if needed. This approach minimizes the risk of damaging your car windows.
Step-by-Step Methods to Remove Stickers from Windows
Now for the part you have been waiting for. Here are the most effective methods for removing stickers from car windows. Each method works for different situations, so feel free to try more than one if needed.
Method 1: Using Heat to Soften the Adhesive
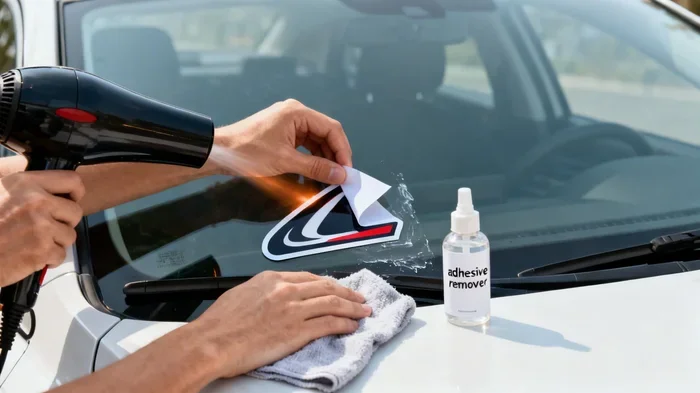
Heat is one of the simplest and most effective ways to remove stickers. The warmth softens the adhesive, allowing you to peel the sticker off in one clean piece. This method works especially well for newer stickers that have not had years to bond deeply with the glass.
Start by plugging in a hair dryer and setting it to medium heat. Hold the dryer about two inches from the sticker and move it back and forth steadily. Heat the entire sticker for about 30 to 60 seconds. You should feel the adhesive softening under your fingers.
Once the sticker feels warm and loose, use your fingernail or a plastic scraper to lift one corner. Peel the sticker slowly at a 180-degree angle. Pulling it back over itself helps release the adhesive from the glass. If the sticker starts to resist, apply more heat and try again.
Quick Tip: Never use a heat gun on high settings. Too much concentrated heat can crack your car window or damage the rubber seals around it. Keep the temperature moderate and the movement constant.
Method 2: Rubbing Alcohol for Sticker Residue
Rubbing alcohol is a go-to solution for removing stickers from glass. It dissolves the adhesive without leaving any harmful residue behind. This makes it one of the safest and most effective options for car windows.
Pour a small amount of rubbing alcohol onto a microfiber cloth. Place the cloth directly over the sticker and let it sit for about five minutes. The alcohol needs time to penetrate the adhesive and break it down. After waiting, gently rub the sticker in circular motions. It should start to lift and dissolve.
For stubborn stickers, you can pour a bit of rubbing alcohol directly onto the sticker. Let it soak for ten minutes before attempting to peel it off. The alcohol weakens the bond between the adhesive and the glass, making removal much easier.
Quick Tip: Always test rubbing alcohol on a small, hidden area of your window first. While it is safe for most glass, some tinted windows may react differently to alcohol-based solutions.
Method 3: Vinegar Solution for Natural Sticker Removal
If you prefer natural cleaning solutions, white vinegar is an excellent choice. It is non-toxic, affordable, and highly effective at breaking down sticker adhesive. This method is perfect for people who want to avoid harsh chemicals on their car.
Mix equal parts white vinegar and warm water in a spray bottle. Spray the solution generously onto the sticker and let it sit for ten to fifteen minutes. The acetic acid in the vinegar works to dissolve the glue bond. After soaking, use a plastic scraper or your fingernail to lift the sticker edge.
Wipe away the loosened sticker and residue with a clean microfiber cloth. You may need to reapply the vinegar solution if some adhesive remains. Repeat the process until the window is completely clean.
Method 4: Using Goo Gone or Commercial Adhesive Removers
When household methods are not enough, commercial adhesive removers come to the rescue. Goo Gone is one of the most popular products for this exact purpose. It is specifically designed to dissolve adhesive without damaging surfaces like glass, paint, or plastic.
Apply a small amount of Goo Gone directly to the sticker or the residue left behind. Let it sit for two to three minutes. The product penetrates the adhesive and weakens its hold on the glass. Then, gently wipe the sticker away with a microfiber cloth.
For particularly tough stickers, you can apply Goo Gone and let it sit for up to ten minutes. Reapply if necessary. Always follow the product instructions and avoid using it on hot surfaces or in direct sunlight.
Quick Tip: WD-40 is another excellent option. Spray a small amount on the sticker, wait a few minutes, and wipe away. WD-40 also leaves a protective layer on the glass that repels future dirt and grime.
Method 5: The Baking Soda Paste for Stubborn Residue
Sometimes the sticker comes off, but you are left with sticky residue that refuses to budge. This is where a baking soda paste works magic. It is a gentle abrasive that lifts residue without scratching your window.
Mix two parts baking soda with one part water to create a thick paste. Apply the paste directly to the sticky residue and let it sit for five minutes. Using a damp microfiber cloth, rub the paste in gentle circular motions. The mild abrasion breaks down the remaining adhesive.
Wipe the area clean with a fresh cloth and warm water. You should see the residue disappear completely. If some residue remains, repeat the process once more. Baking soda is safe for all window types, including tinted glass.
How to Deal with Sticky Residue After Sticker Removal
Removing the sticker itself is only half the battle. The real challenge often comes next: dealing with the window sticker residue that remains. This sticky film can attract dust, look unsightly, and even interfere with your windshield wipers if left untreated.
Why Residue Happens
When a sticker sits on a window for a long time, the adhesive seeps into the glass surface. Even after you peel off the sticker, traces of that adhesive remain bonded to the glass. This residue is especially common with older stickers or those exposed to extreme heat and cold over time.
Best Techniques for Residue Removal
Here are the most effective ways to eliminate sticky residue from your car windows:
- Rubbing alcohol method: Soak a microfiber cloth in rubbing alcohol and place it over the residue. Let it sit for five minutes, then wipe away gently.
- Oil-based approach: Apply a small amount of coconut oil or olive oil to the residue. Let it sit for three minutes, then rub it off with a clean cloth.
- Commercial remover: Spray a dedicated adhesive remover directly onto the residue. Wait two minutes and wipe clean with a microfiber towel.
- Vinegar soak: Apply undiluted white vinegar to the affected area. Let it sit for ten minutes before scrubbing gently with a soft cloth.
- Heat reapplication: Sometimes reheating the residue with a hair dryer softens it enough to wipe away completely.
Expert Insight: Always use a microfiber cloth when cleaning residue. Paper towels and regular cloths can leave lint behind or even create micro-scratches on your glass surface.
Tips to Prevent Damage to Your Car Windows
Removing stickers is one thing. Doing it without damaging your windows is another matter entirely. Car windows are not just plain glass. Many have tinting, special coatings, or protective layers that can be harmed by aggressive removal methods.
What to Avoid During Sticker Removal
Keep these common mistakes in mind to protect your car windows:
- Never use a metal razor blade at a steep angle: This can scratch the glass or damage window tinting.
- Avoid excessive heat: Too much concentrated heat can crack tempered glass or peel away window seals.
- Do not use harsh chemicals on tinted windows: Some solvents can degrade the tint adhesive and cause bubbling.
- Skip abrasive scrubbers: Steel wool or rough pads will leave visible scratches on your glass.
- Do not pull stickers off quickly: Rapid peeling can snap the sticker and leave adhesive fragments behind.
Protecting Tinted Windows
If your car has tinted windows, you need to be extra careful. The tint is applied to the interior side of the glass and can be damaged by certain chemicals and scraping methods. Stick to gentle methods like heat and alcohol-based solutions. Avoid any metal tools entirely. If you are unsure about your tint type, test any removal solution on a small hidden area first.
Pro Tip: Consider applying a paint protection film to your windows if you frequently deal with stickers or decals. This clear protective layer acts as a barrier between the adhesive and your glass, making future removal much easier.
When to Seek Professional Help for Sticker Removal
Most sticker removal jobs can be handled at home with the methods described above. However, there are situations where professional help is the smarter choice. Knowing when to call in an expert can save you time, money, and the frustration of a job gone wrong.
Signs You Need a Professional
Watch for these warning signs that indicate the sticker removal is beyond a DIY project:
- The sticker has been on the window for over five years and shows no signs of loosening.
- The window has a special coating or treatment that you are unsure about.
- You have tried multiple methods and still cannot remove the residue completely.
- The sticker is located in a critical visibility area like the driver’s line of sight.
- You notice cracks or chips in the glass near the sticker.
Professional detailers have access to industrial-grade tools and solutions that are not available at your local store. They also have the experience to handle delicate situations like tinted windows, custom coatings, and vintage car glass. The cost is usually reasonable, especially when compared to the expense of replacing a damaged window.
How to Keep Your Windows Sticker-Free in the Future
Once you have successfully removed those unwanted stickers, you probably want to keep your windows clean going forward. Prevention is always easier than cure, and there are simple steps you can take to make future sticker removal a breeze.
Apply a Glass Coating
A quality glass coating creates a smooth, hydrophobic surface that makes it harder for stickers and decals to bond strongly. Products like ceramic coatings or glass sealants create a protective barrier that reduces adhesive grip. This means that when you do need to remove a sticker, it comes off much more easily.
Use Removable Adhesive Products
If you enjoy decorating your car with stickers or decals, consider switching to removable adhesive products. These are specifically designed to come off cleanly without leaving residue. They are widely available online and at auto parts stores. While they may cost a little more, the convenience and window protection are well worth it.
Regular Maintenance Routine
Make it a habit to inspect your car windows regularly. If you notice a new sticker or decal, remove it as soon as possible. Fresh stickers are always easier to remove than old ones. A quick wipe-down with a glass cleaner after removal also helps maintain the clarity and integrity of your windows.
Regular car detailing sessions also help. During a detailing, professionals can address any early signs of adhesive buildup before it becomes a serious problem. This proactive approach keeps your car looking its best and saves you from difficult removal jobs down the road.
Common Mistakes People Make When Removing Stickers from Windows
Even with the best intentions, many people make avoidable mistakes during the sticker removal process. Learning from these errors can save you time and protect your car windows from unnecessary damage.
Mistake 1: Peeling the Sticker Too Quickly
One of the most common mistakes is ripping the sticker off in a hurry. This almost always leaves behind a mess of adhesive and broken sticker pieces. The sticker snaps instead of releasing cleanly from the adhesive layer. Always peel slowly and steadily, using heat to soften the glue first.
Mistake 2: Using the Wrong Scraping Tool
Some people reach for a metal butter knife, a key, or even a screwdriver to scrape off sticker residue. These tools are far too harsh for car windows. They can create fine scratches that are invisible at first but become noticeable over time. Always use a plastic scraper or a dedicated plastic razor blade designed for glass cleaning.
Mistake 3: Skipping the Residue Cleanup
It is tempting to call it done once the sticker itself is off. But leftover residue is just as bad as the original sticker. It attracts dirt, looks terrible, and can interfere with your visibility. Always take the extra few minutes to clean up any remaining adhesive using the methods described above.
Mistake 4: Using Too Much Chemical Product
More product does not mean faster results. In fact, using too much adhesive remover can leave a greasy film on your glass that is just as annoying as sticker residue. Use products sparingly and wipe away excess immediately. A little goes a long way when it comes to adhesive remover products.
Frequently Asked Questions
Can I use a razor blade to scrape off a sticker from my car window?
Yes, but only if you use a plastic razor blade designed for automotive glass cleaning. Metal razor blades can scratch your window and damage any tinting. Always hold the blade at a low angle and use gentle pressure. A plastic scraper is a safer alternative that works just as effectively for most sticker removal jobs.
Will rubbing alcohol damage my car window tint?
Rubbing alcohol is generally safe for most window tints when used in moderation. However, repeated or prolonged exposure can degrade the tint adhesive over time. To be safe, apply rubbing alcohol with a cloth rather than spraying it directly. Limit contact time to five minutes or less, and always test on a small hidden area first.
What is the easiest way to remove old bumper stickers from a car?
The easiest way is to combine heat with an adhesive remover. Start by warming the sticker with a hair dryer for 30 to 60 seconds. Then apply a product like Goo Gone or rubbing alcohol to dissolve the adhesive. Peel the sticker slowly and wipe away any remaining residue with a microfiber cloth. This combination works for even the oldest, most stubborn bumper stickers.
How do I remove stickers from a car window without scratching it?
To avoid scratches, always use a plastic scraper instead of a metal one. Apply heat before peeling to soften the adhesive. Use gentle circular motions when wiping. Never use abrasive pads or rough cloths. Stick to microfiber towels and dedicated glass-safe cleaning products. Following these steps ensures your window stays scratch-free throughout the removal process.
Does WD-40 work for removing sticker residue from glass?
Yes, WD-40 is highly effective at dissolving sticker residue on glass. Spray a small amount directly onto the residue and let it sit for three to five minutes. Wipe away with a clean microfiber cloth. WD-40 also leaves a thin protective layer that helps repel future dirt and grime. Just make sure to clean the area with glass cleaner afterward to remove any oily residue.
How long does it take to remove a sticker from a car window?
The time varies depending on the sticker type, age, and removal method. A fresh promotional sticker might come off in just a few minutes. An old bumper sticker could take 20 to 30 minutes, especially if there is heavy residue involved. Patience is key. Rushing the process often leads to incomplete removal or window damage, which only extends the overall time needed.
Final Thoughts
Removing stickers from your car windows does not have to be a frustrating experience. With the right tools, the right methods, and a little patience, you can restore your windows to their original clarity. Whether you choose heat, rubbing alcohol, vinegar, or a commercial product like Goo Gone, the key is to work gently and methodically.
Remember that how do you get stickers off windows depends on the sticker type, the age of the sticker, and the condition of your glass. Start with the gentlest method and escalate only if needed. Always clean up residue thoroughly and protect your windows from future damage with coatings or protective films.
Now that you have all the knowledge and techniques at your fingertips, there is no reason to let those ugly stickers hang around any longer. Grab your supplies, pick your favorite method, and give your car windows the fresh, clean look they deserve. Your car will thank you, and every time you get behind the wheel, you will enjoy a clear, sticker-free view of the road ahead.