How Do You Read How Much Oil Is Left on the Dipstick
Knowing how to read how much oil is left on the dipstick is one of the easiest ways to protect your engine. This guide walks you through every step, from locating the dipstick to understanding the minimum and maximum marks. You will also learn common mistakes to avoid and when to add oil versus schedule a full oil change.
Your engine oil is the lifeblood of your car. It keeps all the moving parts lubricated, reduces friction, and prevents overheating. But here is the thing — many drivers never think about their oil level until something goes wrong. A simple dipstick check takes less than two minutes and can save you from costly repairs down the road. In this guide, we will walk you through exactly how to read how much oil is left, what the markings mean, and how to keep your engine running smoothly.
Whether you are a complete beginner or just need a refresher, this article covers everything you need to know about checking your oil level the right way. We will also cover common mistakes, warning signs, and expert tips that most car owners overlook. Let us get into it.
Key Takeaways
- Always check oil on a level surface with a cool engine for the most accurate reading.
- The dipstick has two marks — minimum and maximum — that tell you your oil level.
- Oil should fall between the two marks, never above the maximum or below the minimum.
- Checking oil regularly prevents engine damage and extends vehicle life.
- Dark, gritty oil means it is time for a change, not just a top-off.
- Low oil warnings on the dashboard should never be ignored.
📑 Table of Contents
- Why Checking Your Oil Level Matters
- How to Read the Dipstick Correctly
- Understanding the Dipstick Marks and Readings
- Common Mistakes When Checking Oil
- When to Add Oil vs. When to Change Oil
- Signs Your Oil Level Is Too Low
- Expert Tips for Maintaining the Right Oil Level
- Frequently Asked Questions
- Conclusion
Why Checking Your Oil Level Matters
Engine oil does more than just lubricate. It cleans internal components, prevents rust, and helps regulate engine temperature. When your oil level drops too low, none of these jobs get done properly. The result can be anything from reduced fuel efficiency to a completely seized engine.
Here is why regular oil checks matter so much:
- Prevents engine wear: Low oil means metal parts grind against each other. Over time, this causes irreversible damage.
- Saves money: Catching low oil early costs nothing. Replacing a damaged engine costs thousands.
- Improves performance: Proper oil levels help your engine run smoothly and efficiently.
- Catches leaks early: A dropping oil level often signals a leak that needs immediate attention.
- Extends engine life: Vehicles with regular oil maintenance last significantly longer.
Most car experts recommend checking your oil at least once a month. If you drive an older vehicle or put a lot of miles on your car, check it every two weeks. And if you notice any low oil symptoms — like engine noise or a warning light on the dash — check it immediately.
How Often Should You Check Oil?
The general rule is simple: check it once a month. However, some situations call for more frequent checks. If you drive in extreme heat or cold, tow heavy loads, or have a high-mileage vehicle, your oil level can drop faster than normal. Making oil level checks part of your routine car maintenance schedule is one of the smartest things you can do.
How to Read the Dipstick Correctly
The dipstick is the tool that lets you measure your oil level. It is a long, thin metal rod with a handle, usually yellow or orange, that slides into the engine block. When you pull it out, the oil coating on the tip tells you exactly how much oil is in the system. Here is the step-by-step process to get an accurate reading.
Step 1: Park on a Level Surface
This is the most important step people skip. If your car is sitting on a slope, the oil will pool to one side and give you a false reading. Pull into a flat garage floor or a level driveway. Turn off the engine and let the car sit for a few minutes so the oil can drain back into the oil reservoir.
Step 2: Locate the Dipstick
Open the hood and look for the dipstick handle. It is usually near the front of the engine and has a brightly colored ring or tab. If you have trouble finding it, consult your owner manual. The dipstick location varies slightly between makes and models, but it is almost always easy to spot.
Step 3: Pull the Dipstick Out
Grasp the handle and pull the dipstick straight out. Wipe the end clean with a paper towel or rag. You want to remove all the old oil so you can see a fresh, accurate reading.
Step 4: Reinsert the Dipstick
Slide the dipstick all the way back in. Do not force it — it should slide in smoothly. Then pull it out again, this time holding it horizontally so the oil does not drip off the tip too quickly.
Step 5: Read the Oil Level
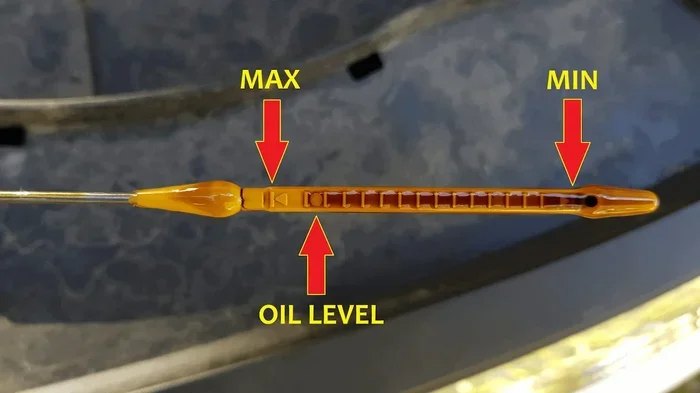
Look at the end of the dipstick where the oil coating ends. You will see two marks — these are your minimum and maximum oil level indicators. The oil should fall somewhere between these two lines. If it is at or near the minimum, you need to add oil. If it is at or above the maximum, you are good to go.
Pro tip: Hold the dipstick up to a light source so you can clearly see the oil line. Some dipsticks have crosshatched patterns instead of lines — the oil should reach the top of the crosshatch area.
Understanding the Dipstick Marks and Readings
The dipstick is designed to be simple, but understanding what the marks mean is crucial. Most dipsticks have two holes, two lines, or two crosshatched areas near the tip. Here is what each one represents:
- Minimum mark (MIN): This is the lowest acceptable oil level. If your oil is at or below this line, you need to add oil right away. Driving with oil below the minimum can cause serious engine damage.
- Maximum mark (MAX): This is the highest acceptable oil level. Adding oil above this mark can also cause problems, which we will cover below.
- Crosshatch or dotted zone: Some dipsticks use a crosshatched pattern between the two lines. The oil should cover the crosshatch area evenly. This is the ideal range.
The oil level indicator on your dipstick works because of a simple principle — oil clings to the metal rod as it is pulled out. The height of the oil film tells you exactly how much oil is sitting in the pan below. It is a remarkably effective and low-tech solution that has worked for decades.
What Color Should Your Oil Be?
Fresh oil is typically amber or golden in color. As it ages, it darkens to brown and eventually black. This is normal and expected. However, if your oil looks milky or frothy, that could indicate a coolant leak mixing with the oil. If the oil feels gritty between your fingers, it has absorbed too much dirt and debris and needs to be changed. Checking oil color is just as important as checking the level.
Common Mistakes When Checking Oil
Even though checking oil is simple, people make mistakes all the time. Here are the most common errors and how to avoid them.
Checking Oil with the Engine Running
Never check your oil while the engine is running. The oil is being pumped through the engine and is not sitting still in the pan. This gives you an inaccurate reading. Always wait at least 5 to 10 minutes after turning off the engine. For the most accurate result, check oil when the engine is cold — meaning you have not driven the car for at least 30 minutes.
Not Wiping the Dipstick Before Reinserting
Skipping the wipe step is one of the fastest ways to get a wrong reading. Old oil on the dipstick tip will mix with the fresh reading and make it look like you have more oil than you actually do. Always wipe, reinsert, and then read.
Checking Oil on an Uneven Surface
We mentioned this above, but it deserves repeating. A car parked on a hill or even a slightly uneven surface will give you a skewed reading. Always find a flat spot before you check.
Ignoring the Oil Color
Level alone does not tell the whole story. Oil that is at the correct level but is dark black and gritty is overdue for a change. Checking both the level and the condition of the oil gives you a complete picture of your engine health.
When to Add Oil vs. When to Change Oil
One of the biggest confusions for car owners is knowing the difference between adding oil and changing oil. These are two very different tasks, and understanding the distinction is key to proper car maintenance.
Adding Oil
You add oil when the level is low but the oil itself is still in good condition. To add oil, locate the oil fill cap on top of the engine (it usually has an oil can symbol). Remove the cap, pour in a small amount of the correct oil type for your vehicle, wait a minute, then recheck the level with the dipstick. Add oil slowly — you can always add more, but you cannot easily remove excess oil.
Changing Oil
Oil changes involve draining the old oil completely and replacing the oil filter before filling the engine with fresh oil. Most vehicles need an oil change every 5,000 to 7,500 miles for conventional oil, or every 7,500 to 10,000 miles for synthetic oil. If you are unsure about your oil change interval, check your owner manual or consult a trusted mechanic. You can also learn more about oil change timing at this guide on oil life percentage.
If you want to handle the job yourself, you can find a step-by-step walkthrough on how to do an oil and filter change yourself. It is a great resource for DIYers who want to save money and learn a new skill.
Comparison: Adding Oil vs. Changing Oil
| Aspect | Adding Oil | Changing Oil |
|---|---|---|
| Purpose | Top off low level | Replace old, degraded oil |
| Frequency | As needed between changes | Every 5,000–10,000 miles |
| Oil Filter | Not replaced | Replaced with new oil |
| Difficulty | Very easy | Moderate to advanced |
| Time Required | 5–10 minutes | 30–60 minutes |
| Cost | Cost of oil only | Oil plus filter plus labor |
Remember, adding oil is not a substitute for a proper oil change. Old oil breaks down over time and loses its ability to lubricate effectively. Even if you top off the level regularly, you still need to change the oil at the recommended intervals.
Signs Your Oil Level Is Too Low
Sometimes you will not get a chance to check the dipstick before problems start. Your car will give you warning signs that your oil level is dangerously low. Knowing these signs can help you act before serious damage occurs.
- Oil pressure warning light: This is the most obvious sign. If the oil pressure light on your dashboard comes on, pull over safely and check your oil immediately.
- Engine knocking or ticking sounds: Insufficient oil means metal parts are rubbing together. This creates a distinct knocking or ticking noise, especially when accelerating.
- Reduced fuel efficiency: When your engine is not properly lubricated, it works harder and burns more fuel.
- Overheating: Oil helps regulate engine temperature. Low oil can cause your engine to run hotter than normal.
- Burning oil smell: If you smell oil burning inside the cabin, your oil level may be so low that it is contacting hot engine parts.
- Smoke from the exhaust: Blue or gray exhaust smoke can indicate oil is leaking into the combustion chamber due to low lubrication.
If you experience any of these symptoms, do not keep driving. Pull over, turn off the engine, and check your oil level. If the oil is very low or completely empty, call for roadside assistance. Continuing to drive on a nearly empty oil supply can destroy your engine in minutes.
Some modern vehicles have electronic oil level sensors that display the oil level on the dashboard screen. If your car has this feature, it is still a good idea to do a manual dipstick check periodically. Electronic sensors can malfunction, and a manual dipstick reading is always the most reliable method.
How Does Low Oil Show on the Dashboard?
Most cars have a dashboard warning light shaped like an oil can or the word “OIL.” When this light illuminates, it means your oil pressure has dropped to a dangerous level. This can happen because of low oil, a failing oil pump, or a clogged oil filter. For more details on how low engine oil shows on the dashboard, you can read our dedicated article on low engine oil dashboard indicators.
Expert Tips for Maintaining the Right Oil Level
Once you know how to read your dipstick, keeping your oil level in the safe zone becomes much easier. Here are some expert-backed tips that make a real difference.
- Use the right oil type. Check your owner manual for the recommended oil viscosity (like 5W-30 or 10W-40). Using the wrong oil can affect both lubrication and your oil level readings.
- Keep a spare quart of oil in your trunk. You never know when you might need a top-off between oil changes, especially on long road trips.
- Track your oil level over time. If you notice your oil dropping faster than usual, it could indicate a leak or excessive oil consumption. Addressing this early can prevent bigger problems.
- Check oil at the same time each month. Building a routine makes it harder to forget and easier to spot trends.
- Do not overfill. Too much oil can foam and lose its lubricating properties. It can also damage your engine’s seals and gaskets.
For vehicles that sit idle for long periods, oil levels can also be affected. If you have a car that has been sitting for a while, check the oil before driving it. You can learn more about how long a car can sit in cold weather without issues in our article on how long a car can sit in cold weather.
How to Know if Your Oil Needs Changing
Beyond just the level, the condition of your oil tells you a lot. Fresh oil is smooth and slightly slippery. If it feels rough or gritty, it has picked up contaminants. If the color is pitch black and smells burnt, it has broken down and needs to be replaced. A simple dipstick check combined with a visual inspection of the oil color gives you all the information you need.
For a more technical approach, some modern vehicles have oil life monitoring systems that calculate when your oil needs replacing based on driving conditions. To understand what these percentages mean, check out our guide on oil life percentage and when to change.
Frequently Asked Questions
How Do You Read How Much Oil Is Left on the Dipstick?
Pull the dipstick out, wipe it clean, reinsert it fully, then pull it out again. Look at the oil film on the tip — it should fall between the minimum and maximum marks. If it is below the minimum, add oil. If it is above the maximum, you have too much oil.
Should You Check Oil When the Engine Is Hot or Cold?
For the most accurate reading, check oil when the engine is cool and has been sitting for at least 10 minutes. This allows all the oil to drain back into the oil pan. However, many manufacturers also accept a warm check — just wait a few minutes after turning off the engine.
What Happens If You Drive with Low Oil?
Driving with low oil causes increased friction between engine parts, leading to overheating, metal-on-metal wear, and eventually engine failure. Even a short drive on very low oil can cause permanent damage.
Can You Overfill Your Engine with Oil?
Yes. Overfilling causes oil to foam, which reduces its lubricating ability. Excess oil can also leak into the combustion chamber, causing blue smoke from the exhaust and potential catalytic converter damage.
How Often Should You Check Your Oil Level?
Check your oil at least once a month. If you drive frequently, tow heavy loads, or own an older vehicle, check it every two weeks. Also check it before any long road trip.
What Color Should Healthy Engine Oil Be?
Healthy oil is amber or golden when new. It darkens to brown and eventually black as it ages. Dark color alone is not a reason to panic — it is normal. However, milky or frothy oil suggests a coolant leak, and gritty oil means it is time for a change.
Conclusion
Learning how to read how much oil is left on the dipstick is one of the simplest and most valuable skills any car owner can have. It takes less than two minutes, requires no special tools, and gives you direct insight into the health of your engine. By following the steps in this guide — parking on a level surface, wiping the dipstick, reinserting it, and reading between the marks — you will always know exactly where your oil level stands.
Remember that checking oil is just one part of a complete maintenance routine. Regular oil changes, using the right oil type, and paying attention to warning signs all work together to keep your vehicle running strong for years to come. Do not wait for a warning light or strange engine noise to take action. Make dipstick checks a habit, and your engine will thank you.
Whether you are a daily commuter or an occasional driver, taking a few minutes each month to check your oil level is a small investment that pays off big. It keeps you safe on the road, saves you from unexpected breakdowns, and helps your vehicle last longer. So grab a paper towel, pop the hood, and give your dipstick a look — your engine will be glad you did.