How to Calibrate Tire Pressure on Your Honda Civic Today
Calibrating tire pressure on your Honda Civic is one of the simplest yet most impactful maintenance tasks you can do. This guide walks you through everything from finding the right PSI to using a tire pressure gauge and air compressor. You will learn how to reset your TPMS, avoid common mistakes, and keep your tires in top shape for years to come.
Your Honda Civic is a reliable, fuel-efficient car that handles beautifully when everything is running right. But here is something many drivers overlook: tire pressure calibration. It might not sound exciting, but getting this one thing right can transform how your car drives, how much gas you use, and how long your tires last.
Whether you are a first-time car owner or a Honda Civic veteran, this guide will show you exactly how to calibrate tire pressure on a Honda Civic in simple, easy-to-follow steps. No mechanic degree required. Just a few tools, a little patience, and about 20 minutes of your time.
We will cover everything from finding the correct PSI to resetting your TPMS light. By the end of this article, you will feel confident handling tire pressure on your own. Let us get started.
Key Takeaways
- Know Your PSI: The recommended tire pressure for a Honda Civic is usually between 30 and 35 PSI, but always check your owner manual or door jamb sticker.
- Calibrate Monthly: Tire pressure changes with temperature and regular driving, so make it a habit to check every month.
- Use the Right Tools: A quality tire pressure gauge and a reliable air compressor make calibration quick and accurate.
- Reset Your TPMS: After calibrating, always reset the Tire Pressure Monitoring System to clear any warning lights.
- Cold Weather Matters: Air pressure drops in cold temperatures, so you may need to add air more frequently during winter months.
- Avoid Overinflation: Too much pressure causes uneven tire wear and reduces traction, which is dangerous on wet roads.
📑 Table of Contents
Understanding Tire Pressure and Your Honda Civic
Before you grab any tools, it helps to understand what tire pressure calibration actually means and why it matters so much for your Honda Civic.
What Does Tire Pressure Calibration Mean?
Tire pressure calibration is the process of setting your tire air levels to the exact amount recommended by Honda for your specific Civic model. Every car has a factory-recommended PSI (pounds per square inch) that balances ride comfort, fuel economy, and safety. When your tires match that number, they wear evenly, grip the road properly, and help your engine work efficiently.
Calibration is not just about adding air. It also means checking that your pressure matches the spec and making adjustments as needed. Over time, air naturally leaks from tires, and temperature changes can cause pressure to rise or drop. That is why regular calibration matters.
Why Honda Civic Tire Pressure Matters So Much
Your Honda Civic was engineered with specific tire pressure requirements in mind. Here is what happens when you get it right — and what goes wrong when you do not:
- Better Fuel Economy: Properly inflated tires reduce rolling resistance, which means your engine does not work as hard. This can improve your gas mileage by up to 3 percent.
- Longer Tire Life: Underinflated tires wear out on the outer edges of the tread. Overinflated tires wear down the center. Correct pressure keeps wear even and extends tire life.
- Safer Driving: The right pressure gives you optimal grip, shorter braking distances, and better handling, especially in wet or icy conditions.
- Smoother Ride: Correctly calibrated tires absorb road imperfections better, giving you a more comfortable driving experience.
If you want to dig deeper into how much weight your vehicle can safely handle, check out our guide on how much weight a regular car can carry, which covers the relationship between vehicle load and tire performance.
Tools You Need for Tire Pressure Calibration
The good news is that calibrating tire pressure on a Honda Civic does not require expensive equipment. Here is what you will need:
Tire Pressure Gauge
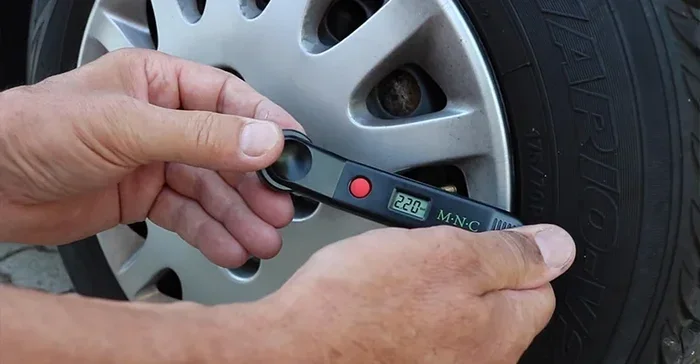
A tire pressure gauge is the most important tool for this job. You have two main options:
- Pencil-Style Gauge: Inexpensive, compact, and easy to use. These are the little stick-style gauges that push out a marked line to show pressure. They work well and cost around $5 to $15.
- Digital Gauge: More precise and easier to read. Digital gauges often have a backlit display and can beep when you reach the target PSI. Expect to pay $15 to $30.
Pick whichever style feels comfortable for you. The key is to get a gauge that is accurate and easy to read.
Air Compressor or Air Pump
You need a way to add air to your tires. Options include:
- Portable 12V Compressor: Plugs into your cigarette lighter. Great for home use and road trips. These cost $20 to $60.
- Gas Station Air Pump: Most gas stations have coin-operated air pumps. Just bring your gauge and some quarters.
- Electric Air Pump: A larger stationary pump for your garage. Ideal if you do a lot of car maintenance at home.
Optional but Helpful
- Tire Pressure Monitor Reset Tool: Some Honda Civics need a dedicated tool or button sequence to reset the TPMS after calibration.
- Valve Stem Caps: Small caps that keep moisture and debris out of your valve stems. A pack costs just a few dollars.
- Owner Manual: Your Honda Civic owner manual has the exact PSI specifications for your model year.
Step-by-Step Guide to Calibrating Tire Pressure
Now that you have your tools ready, let us walk through the actual process of calibrating tire pressure on your Honda Civic. Follow these steps in order for the best results.
Step 1: Find the Recommended PSI
Open your Honda Civic owner manual and look for the tire pressure section. The recommended PSI is also printed on a sticker inside the driver-side door jamb. You will typically see something like “Front: 32 PSI, Rear: 32 PSI.” Note that some Civic models may have different pressures for the front and rear tires.
Do not use the PSI printed on the tire sidewall. That number is the maximum pressure the tire can handle, not the recommended pressure for your car.
Step 2: Check Current Tire Pressure
Remove the valve stem cap from the first tire. Press your tire pressure gauge firmly onto the valve stem. You should hear a brief hiss of air, and the gauge will display the current pressure. Write down the reading for each tire.
For the most accurate reading, check your tires when they are cold — meaning the car has been parked for at least three hours or driven less than a mile. Driving heats up the air inside the tires and raises the pressure reading.
Step 3: Add or Release Air as Needed
Compare your readings to the recommended PSI. If a tire is low, attach your air compressor hose to the valve stem and add air in short bursts. Check the pressure after each burst to avoid overinflating.
If a tire is too high, press the small pin inside the valve stem to release a little air. Check again after each release. Go slowly — it is easy to let too much air out.
Step 4: Replace Valve Stem Caps
Once all four tires are at the correct PSI, put the valve stem caps back on. These small caps protect the valve stem from dirt and moisture, which can cause slow leaks over time.
Step 5: Reset the TPMS
After calibrating, your Tire Pressure Monitoring System may still show a warning light. To reset it:
- Turn the ignition to the “ON” position (do not start the engine).
- Locate the TPMS reset button, usually found below the steering column.
- Press and hold the button until the TPMS light blinks three times.
- Start the engine and let the car idle for about 20 minutes.
The light should turn off. If it stays on, you may need to drive the car for a few miles at highway speed for the system to recalibrate.
Common Tire Pressure Mistakes and How to Avoid Them
Even experienced car owners make mistakes with tire pressure. Here are the most common ones and how to avoid them:
Mistake 1: Only Checking Tires When the Light Comes On
Do not wait for your TPMS warning light to check your tire pressure. By the time the light comes on, your tires are already significantly underinflated, which can be dangerous. Make it a habit to check pressure at least once a month.
Mistake 2: Ignoring Temperature Changes
Cold weather causes tire pressure to drop. For every 10-degree drop in temperature, your tires can lose about 1 PSI. During winter months, check your pressure more frequently and add air as needed. If you want to understand how cold weather affects your car overall, our article on how long a car can sit in cold weather covers this topic in detail.
Mistake 3: Overinflating for Better Fuel Economy
Some drivers overinflate their tires thinking it will improve gas mileage. While slightly higher pressure can reduce rolling resistance, overinflation is dangerous. It reduces the tire contact patch, hurts traction, and causes uneven center wear. Stick to the manufacturer’s recommended PSI.
Mistake 4: Forgetting the Spare Tire
Your spare tire also needs proper pressure. Many people forget about it until they need it and find it flat. Check your spare tire pressure at least twice a year.
Mistake 5: Using a Damaged or Inaccurate Gauge
Cheap or worn-out gauges can give false readings. If your pencil-style gauge looks bent or the readings seem inconsistent, replace it. A reliable digital gauge is a worthwhile investment for any car owner.
Honda Civic Tire Pressure Maintenance Tips
Calibrating tire pressure is not a one-time task. Here are some habits that will keep your Honda Civic tires in excellent shape:
Make It a Monthly Routine
Set a reminder on your phone to check tire pressure on the first of every month. It takes less than 15 minutes and can save you hundreds of dollars in tire replacements over the life of your car.
Invest in a Quality Digital Tire Pressure Gauge
A good digital gauge pays for itself quickly by helping you catch slow leaks early. Look for one with a pressure range of 0 to 65 PSI and an accuracy of plus or minus 1 PSI.
Inspect Your Tires Regularly
While checking pressure, take a moment to look at your tires. Check for uneven wear, bulges, cracks, or embedded objects like nails or screws. Catching a slow leak early can prevent a flat tire at the worst possible moment.
Rotate Your Tires on Schedule
Tire rotation helps your tires wear evenly and last longer. Most Honda Civic owners should rotate tires every 5,000 to 7,500 miles. Check your owner manual for the recommended interval.
Keep a Tire Pressure Log
It sounds old-fashioned, but keeping a simple notebook or phone note with your monthly pressure readings helps you spot trends. If you notice one tire consistently losing air, you may have a slow leak that needs professional attention.
When to Seek Professional Help
Most tire pressure calibration is straightforward and safe to do at home. However, there are times when you should see a professional:
- TPMS Light Stays On After Reset: This could indicate a faulty sensor, a slow leak, or a deeper issue with the monitoring system.
- Frequent Pressure Loss: If you are adding air more than once a month, your tire may have a puncture or a damaged valve stem.
- Visible Tire Damage: Bulges, cuts, or exposed cords mean the tire needs immediate replacement.
- TPMS Sensor Replacement: If a sensor fails, a mechanic can replace it quickly and reprogram your system.
For more information about car maintenance and troubleshooting, check out our guide on how to clear a check engine code, which covers related dashboard warning systems and when to address them yourself versus visiting a mechanic.
Conclusion
Calibrating tire pressure on your Honda Civic is one of the easiest and most rewarding maintenance tasks you can do. It takes just a few minutes, costs almost nothing, and pays off in better fuel economy, safer driving, and longer-lasting tires. By following the steps in this guide — finding the right PSI, using a quality gauge, adding or releasing air carefully, and resetting your TPMS — you will keep your Honda Civic running at its best.
Make tire pressure checks a regular part of your car care routine. Your wallet, your safety, and your Honda Civic will all thank you. Start today, and you will never look back.
Frequently Asked Questions
What is the recommended tire pressure for a Honda Civic?
The recommended tire pressure for most Honda Civic models is between 30 and 35 PSI. However, the exact number varies by model year and trim level. Always check the sticker on your driver-side door jamb or your owner manual for the precise specification.
How often should I calibrate my Honda Civic tire pressure?
You should check and calibrate your tire pressure at least once a month. Additional checks are recommended before long road trips, during seasonal temperature changes, or whenever the TPMS warning light comes on.
Can I use the tire pressure number printed on the tire sidewall?
No. The number on the tire sidewall is the maximum pressure the tire can safely handle, not the recommended pressure for your Honda Civic. Always use the PSI listed on the door jamb sticker or in the owner manual.
Why does my TPMS light stay on after I calibrate my tires?
The TPMS light may stay on if the system has not fully recalibrated. Try resetting the TPMS using the reset button under your steering column. If the light persists after driving for 20 minutes, there may be a faulty sensor or a slow leak that needs professional diagnosis.
Does cold weather affect Honda Civic tire pressure?
Yes. Cold weather causes the air inside your tires to contract, which lowers the pressure. For every 10-degree drop in temperature, you can expect about a 1 PSI decrease. During winter, check your pressure more frequently and add air as needed to stay within the recommended range.
Is it safe to drive with the TPMS light on?
Driving with the TPMS light on is not recommended. It means one or more tires are significantly underinflated, which can reduce traction, increase stopping distance, and cause uneven tire wear. Check your tire pressure immediately and inflate to the correct PSI before driving long distances.