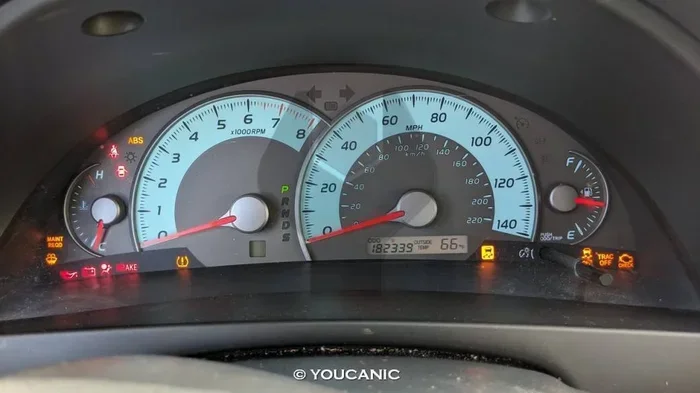
Does the Check Engine Light Come On for Toyota Oil Change
Does the check engine light come on for a Toyota oil change? Generally, no—a routine oil change should not trigger this warning. However, a loose oil cap, faulty sensor, or other issue can cause the check engine light to illuminate right after service. Understanding the difference between the check engine light and other Toyota warning lights helps you respond correctly and avoid unnecessary panic.
You just left the Toyota dealership or a quick oil change shop. You get in your car, turn the key, and see a yellow engine-shaped icon glowing on the dashboard. Your heart sinks. Did the oil change cause the check engine light to come on? This is a common worry for Toyota owners, and it can be stressful. The good news is that a routine oil change should not trigger this warning. But sometimes, things go wrong during service, and a light appears. In this guide, we will explain exactly why the check engine light might turn on after a Toyota oil change and what you should do next.
Understanding your Toyota’s warning system is easier than you think. The dashboard has several lights, and each one means something different. The check engine light specifically monitors the engine’s emissions system. It does not directly track oil levels or oil change intervals. So if it comes on, something else is going on. Let’s break down the possible causes, how to diagnose them, and how to fix the problem quickly.
Whether you drive a Camry, RAV4, or Highlander, the same rules apply. The check engine light is a universal signal that something needs attention. It could be as simple as a loose gas cap or as complex as a failing sensor. By the end of this article, you will know exactly what to look for and how to respond. You will also learn how to reset the light and prevent it from happening again.
Key Takeaways
- 1. The check engine light usually stays off: A normal oil change does not trigger this warning on a Toyota.
- 2. Loose oil caps are a common culprit: A poorly sealed cap can cause a vacuum leak and illuminate the light.
- 3. Faulty sensors can misfire: The oil pressure sensor or O2 sensor might send false readings after service.
- 4. Resetting the light is often simple: A code reader or battery disconnect can clear the error.
- 5. Other dashboard lights differ: The wrench light or maintenance required light is separate from the check engine light.
- 6. Driving safety matters: If the light flashes, stop and check for serious issues like low oil pressure.
📑 Table of Contents
- Why the Check Engine Light Might Come On After an Oil Change
- Understanding the Difference Between Warning Lights on Toyota
- How to Diagnose the Real Cause
- Step-by-Step: Resetting the Check Engine Light
- When to Worry and Seek Professional Help
- Preventing the Check Engine Light After Your Next Toyota Oil Change
- Conclusion
Why the Check Engine Light Might Come On After an Oil Change
A Toyota oil change is a simple service, but many things can go wrong. The mechanic might forget to tighten the oil cap, or a sensor might get bumped. Sometimes the light was already on, and you just noticed it after the service. Let’s look at the most common reasons the check engine light appears after an oil change.
Loose Oil Cap: The Most Common Cause
The oil cap seals the engine’s crankcase. It keeps pressure and fumes contained. If the cap is loose, cross-threaded, or missing, the engine can leak vapor. This creates a vacuum leak that the car’s computer detects. The result? The check engine light turns on. This is the number one reason for a false alarm after an oil change. It is also the easiest to fix.
Here is what to do:
- Turn off the engine and let it cool for a few minutes.
- Open the hood and locate the oil fill cap.
- Check that it is screwed on tightly until you hear a click.
- Drive for a few miles and see if the light goes off.
If the cap was loose, the light should turn off within a few driving cycles. This is a very common scenario and nothing to worry about.
Sensor Issues and Faulty Readings
Modern Toyotas have many sensors that monitor engine performance. The oil pressure sensor, the mass airflow sensor, and the oxygen sensor all play a role. During an oil change, a technician might accidentally bump a sensor or connector. This can send a false signal to the car’s computer. The computer then stores a diagnostic trouble code and lights up the check engine light.
Sometimes the oil pressure sensor itself fails. If it reads low oil pressure when the oil level is actually fine, the light comes on. This can happen if the sensor was not reseated properly after the oil change. In rare cases, the wrong type of oil or filter can cause pressure issues. Using low-quality oil or an incorrect filter can stress the system and trigger a warning.
If you suspect a sensor problem, do not ignore it. A faulty reading can lead to poor fuel economy or engine damage over time.
Understanding the Difference Between Warning Lights on Toyota
Toyota dashboards have many symbols. It is easy to confuse them. The check engine light is not the only warning light. Knowing the difference helps you respond correctly. A Toyota oil change might trigger a different light entirely, and that light means something else.
Check Engine Light vs. Wrench Light
The check engine light looks like an engine block. It is yellow or orange. It indicates a problem with the emissions system. The wrench light, on the other hand, is a wrench icon. It is a maintenance reminder. It tells you that it is time for scheduled service, like an oil change or tire rotation. The wrench light does not mean something is broken.
Many Toyota owners mix these up. They see the wrench light and think the car is in trouble. To learn more about what the wrench light means, check out our guide on Does The Wrench Light Mean An Oil Change. That article explains the difference clearly and helps you avoid unnecessary trips to the shop.
Maintenance Required Light Explained
The maintenance required light is a simple service interval indicator. It comes on every 5,000 miles or so, depending on your driving habits. It is not a warning about a mechanical problem. After an oil change, the service technician should reset this light. If they forget, the light will stay on. This is different from the check engine light. The maintenance required light is just a reminder, not a fault code.
If you see the maintenance required light after an oil change, ask the technician to reset it. Most Toyota models allow a simple reset through the steering wheel controls or the dashboard menu.
How to Diagnose the Real Cause
When the check engine light stays on after an oil change, you need to find the root cause. Guessing will only waste time and money. The best way to diagnose the issue is to read the error codes stored in the car’s computer. Every modern Toyota has an OBD-II port under the dashboard. A scan tool plugs into this port and retrieves the codes.
Using an OBD-II Scanner
An OBD-II scanner is a small device that reads diagnostic trouble codes. You can buy one at any auto parts store for under $50. Some Walmart and AutoZone stores will read the codes for free. Here is how it works:
- Locate the OBD-II port under your dashboard on the driver’s side.
- Plug the scanner into the port.
- Turn the ignition to the “On” position (do not start the engine).
- Follow the scanner’s menu to read the codes.
- Write down the codes and look them up online or in the scanner’s database.
Common codes after an oil change include P0456 (evaporative emission leak), P0521 (oil pressure sensor range), and P0300 (random misfire). A loose oil cap often triggers P0456. If you see P0521, the oil pressure sensor might be the problem. If you are not comfortable reading codes yourself, many local auto parts stores will do it for free.
Common Diagnostic Trouble Codes After Oil Service
After a Toyota oil change, certain codes pop up more often than others. The P0456 code is the most common. It points to a small leak in the evaporative emission system. A loose oil cap or a cracked fuel tank canister can cause this. The P0521 code relates to oil pressure. If the technician overfilled or underfilled the oil, the pressure sensor might flag it. Another common code is P0420, which indicates catalyst system efficiency below threshold. This is less likely to be caused by an oil change, but it can appear if the car was running rough before service.
Understanding these codes helps you talk to a mechanic with confidence. You will know what they are referring to and whether the issue is serious.
Step-by-Step: Resetting the Check Engine Light
Once you fix the underlying problem, the check engine light will not turn off automatically right away. The car’s computer needs to see that the issue is resolved over several driving cycles. You can speed up the process by resetting the light. There are two common methods. One uses a code reader, and the other involves disconnecting the battery.
Method 1: Using a Code Reader
This is the safest and most recommended way. If you used an OBD-II scanner to read the codes, the same device can clear them. Here is the process:
- Plug the scanner into the OBD-II port.
- Turn the ignition to the “On” position.
- Navigate to the “Clear Codes” or “Erase DTCs” menu.
- Confirm the action and wait for the scanner to finish.
- Start the engine and drive for 50 to 100 miles.
If the problem is truly fixed, the check engine light will stay off. If the issue returns, the light will come back on, and the scanner will show the same codes again. For more detailed steps on clearing engine lights, our article on How Do I Get Rid Of The Engine Management Light provides a full walkthrough.
Method 2: Disconnecting the Battery
Some owners prefer to disconnect the negative battery terminal for 15 minutes. This resets the car’s computer and clears all codes. However, this method has downsides. It can reset your radio presets, clock, and power window settings. It can also erase learned shift points on some automatic transmissions. Use this method only if you do not have a scanner and the light is bothering you.
To disconnect the battery safely:
- Turn off the engine and all accessories.
- Locate the negative battery terminal (marked with a minus sign).
- Use a wrench to loosen the nut on the cable clamp.
- Remove the cable and let it sit for 15 minutes.
- Reconnect the cable and tighten the nut.
- Start the engine and check if the light is off.
Remember, disconnecting the battery does not fix the underlying problem. It only erases the code. If the issue persists, the light will return.
When to Worry and Seek Professional Help
Not every check engine light is an emergency. A solid yellow light usually means a non-critical issue, like a loose cap. A flashing light, however, is a different story. A flashing check engine light indicates a severe engine misfire. Unburned fuel is entering the exhaust system, which can damage the catalytic converter. If you see a flashing light, pull over safely and turn off the engine. Do not keep driving.
Flashing Light vs. Solid Light
A solid yellow check engine light gives you time to investigate. You can drive to a nearby shop or home carefully. A flashing light means stop immediately. The engine is misfiring, and continued driving can cause expensive damage. Even if you just had an oil change, a flashing light is not normal and needs urgent attention.
Signs of Low Oil Pressure
The check engine light is not the only indicator of oil problems. Toyota also has an oil pressure warning light, which looks like an oil can with a drip. If that light comes on, check your oil level right away. Low oil pressure can destroy an engine in minutes. For more information on what low oil looks like on your dashboard, see our article on Does Low Engine Oil Show On The Dashboard. That guide explains the different oil-related warnings and what they mean.
If you notice any of these signs—oil pressure light, unusual engine noise, or a strong smell of oil—do not ignore them. Pull over, check the oil level, and call for roadside assistance if needed.
Preventing the Check Engine Light After Your Next Toyota Oil Change
Prevention is always better than cure. You can take simple steps to avoid a check engine light after your next service. These tips are easy to follow and can save you a lot of stress.
- Watch the technician: Ask them to double-check the oil cap after filling. A quick click can prevent a false alarm.
- Use the right oil: Always use the oil grade recommended in your Toyota owner’s manual. Using the wrong weight can affect engine performance.
- Check the oil level: After the service, verify the oil level on the dipstick. Overfilling can cause pressure issues.
- Ask for a reset: Remind the technician to reset the maintenance required light if that is the only indicator on.
- Keep your receipts: A record of service helps if you need to diagnose a problem later.
These small habits make a big difference. A Toyota oil change should be a simple, stress-free experience. When you stay involved, you catch mistakes early and keep your car running smoothly.
Conclusion
The check engine light coming on after a Toyota oil change is usually not a sign of a serious problem. In most cases, a loose oil cap or a bumped sensor is the culprit. These issues are easy to fix and often clear up on their own. However, it is always smart to check the light and understand what it means. Use an OBD-II scanner to read the codes, and address the root cause before resetting the light.
Remember the difference between the check engine light, the wrench light, and the maintenance required light. Each one serves a unique purpose. If you are ever unsure, a trusted mechanic can help you diagnose the issue quickly. Taking care of your Toyota with regular oil changes and proper maintenance keeps the engine healthy and the warning lights off. Stay proactive, and your Toyota will reward you with years of reliable service.
Frequently Asked Questions
Can an oil change cause the check engine light to come on?
Yes, but only indirectly. A loose oil cap, a faulty sensor, or an overfilled oil level can trigger the light. The oil change itself is not the cause; it is the mistake during service that sets it off. Always double-check the oil cap after a service.
How long does the check engine light stay on after an oil change?
If the issue is minor, like a loose cap, the light may turn off after a few driving cycles, which can take 1 to 3 days of normal driving. If the light stays on for more than a week, you should have the codes read to find the real problem.
Is it safe to drive with the check engine light on after an oil change?
Generally, yes, if the light is solid yellow. A solid light usually indicates a non-critical issue. However, if the light flashes or you notice any unusual symptoms like engine shaking or low oil pressure, stop driving and seek help immediately.
What should I do if the check engine light comes on right after an oil change?
First, check the oil cap and make sure it is tight. Next, check your oil level on the dipstick. If both look fine, use an OBD-II scanner to read the codes. This will tell you exactly what triggered the light and help you decide whether to visit a mechanic.
Will disconnecting the battery reset the check engine light?
Yes, disconnecting the battery for about 15 minutes can clear the codes and turn off the light. However, this method does not fix the underlying problem. The light will return if the issue is not resolved. Use this method only as a temporary measure.
How can I tell the difference between the check engine light and the maintenance required light on a Toyota?
The check engine light looks like an engine block and is yellow or orange. It indicates an emissions problem. The maintenance required light looks like a wrench or a service symbol and is often yellow too. It simply reminds you that scheduled service is due. For more details, see our article on the wrench light.