Exactly How Many Ohms Should a Good Ignition Coil Have
A good ignition coil should typically read between 0.4 and 2.0 ohms on the primary winding and between 6,000 and 15,000 ohms on the secondary winding. Knowing these ignition coil resistance values helps you diagnose starting problems, engine misfires, and poor performance before they become expensive repairs. In this guide, we walk you through the exact ohms reading you should expect, how to test your coil properly, and what to do when the numbers are off.
Knowing how many ohms should a good ignition coil have is one of the most important things every car owner should understand. A healthy ignition coil delivers the high voltage needed to create a spark at the spark plug, and its resistance readings tell you everything about its condition. Most coils should show a primary winding resistance between 0.4 and 2.0 ohms and a secondary winding resistance between 6,000 and 15,000 ohms. When these numbers fall outside the expected range, you are looking at a bad ignition coil that can cause misfires, hard starts, and poor fuel economy. This guide walks you through the exact ignition coil resistance values, how to test them yourself, and what to do when the readings are wrong.
If you have ever turned your key and heard nothing but a clicking sound, the ignition coil might be the culprit. This small but mighty component is the heart of your ignition system, transforming low battery voltage into the thousands of volts needed to fire each cylinder. Understanding the proper ohms reading for your coil can save you time, money, and a lot of frustration at the auto parts store. In this article, we break down everything you need to know about ignition coil testing, from the numbers on a multimeter to the symptoms that tell you something is wrong.
Key Takeaways
- Primary winding should read 0.4 to 2.0 ohms: This is the standard range for most automotive ignition coils.
- Secondary winding should read 6,000 to 15,000 ohms: Higher resistance is normal for the secondary side.
- Use a digital multimeter for accurate readings: Analog meters can give misleading results.
- Cold and heat affect coil performance: Extreme temperatures can cause resistance to fluctuate.
- A bad ignition coil causes misfires and hard starts: Do not ignore these warning signs.
- Test the coil when it is cool for the most accurate reading: Heat changes the resistance value.
- Replacing a failing coil early prevents damage to other ignition system components: It is a small fix that saves big money.
📑 Table of Contents
What Exactly Does an Ignition Coil Do?
The Role of the Ignition Coil in Your Engine
Your engine needs a spark to ignite the air-fuel mixture in each cylinder. The ignition coil is the component that makes that spark possible. It takes the 12 volts from your battery and transforms it into anywhere from 20,000 to 50,000 volts. This high voltage travels through the spark plug wires and creates a spark at the plug tip. Without a working coil, your engine simply cannot run. That is why understanding ignition coil resistance is so important for every car owner.
The ignition coil works like a transformer. It steps up the low voltage from your battery to the high voltage needed for spark plug firing. When you turn the key, the coil receives a signal from the engine control module. It then fires the spark at exactly the right moment. If the resistance value is off, the timing and strength of that spark suffer. This is why a simple coil ohm test can reveal so much about the health of your ignition system.
Primary Winding vs. Secondary Winding
Every automotive ignition coil has two sets of wire coils inside it. The primary winding is the first set of wire wraps. It handles the lower voltage coming from your battery. The secondary winding has many more wraps of finer wire. This is where the voltage gets boosted to the thousands of volts needed for a spark. Each winding has its own resistance value, and both need to be in the correct range for the coil to work properly. When either winding is out of spec, your ignition system suffers.
Think of it like a gear system. The primary winding is the low gear, taking in power at a low level. The secondary winding is the high gear, multiplying that power to a much higher level. If either gear is worn or damaged, the whole system fails. That is why checking both the winding resistance of the primary and secondary sides is essential during any ignition coil testing procedure.
How Many Ohms Should a Good Ignition Coil Have?
Primary Winding Resistance Values
The primary winding is the first place to check when you are testing a coil. For most vehicles, a healthy primary winding should read between 0.4 and 2.0 ohms. Some manufacturers specify a narrower range, so always check your service manual for the exact ignition coil specs for your particular model. If your reading is zero ohms, the winding is shorted. If it reads infinite ohms, the winding is open. Either way, the coil needs to be replaced. A simple coil ohm test with a digital multimeter will tell you exactly where you stand.
Keep in mind that different vehicles have different specifications. A high-performance engine may require a coil with a different resistance value than a standard economy car. Always refer to the factory service manual or a reliable database for your specific make and model. Guessing can lead to replacing a perfectly good coil or missing a failing one. The ohms reading on the primary winding gives you the first clue about the overall health of the coil.
Secondary Winding Resistance Values
The secondary winding handles the high-voltage side of the circuit. A good secondary winding should typically read between 6,000 and 15,000 ohms. Some high-performance coils may read even higher. The exact number depends on your vehicle make and model. If your secondary reading is too low, the coil cannot generate enough voltage to create a strong spark. If the reading is too high, the current flow is restricted. Either condition leads to poor spark plug firing and engine performance issues. Always compare your reading to the factory specifications for your specific vehicle.
The secondary winding has many more turns of wire than the primary. This is what creates the voltage boost needed for spark plug firing. When the secondary winding develops a problem, the effects are usually very noticeable. You may experience rough running, loss of power, or difficulty starting. A multimeter reading on the secondary winding is your best tool for catching these issues early. Do not skip this step during any ignition coil replacement diagnosis.
How Temperature Affects Your Ohms Reading
Temperature plays a bigger role in resistance readings than many people realize. When a coil is cold, the resistance is typically lower. As the coil heats up under the hood, the resistance increases. This is normal and expected. However, if the resistance changes dramatically with temperature, that is a red flag. Extreme cold can also affect how your car starts and runs. For example, leaving your car sitting in cold weather for extended periods can stress the entire ignition system, including the coil. Similarly, extreme heat from the sun can push underhood temperatures to levels that degrade coil performance over time.
This is why testing the coil when it is cool gives you the most consistent multimeter reading. Hot coils can show resistance values that are significantly higher than the factory spec, even if the coil is actually healthy. Always let the engine cool down for at least 30 minutes before testing. This ensures your ignition coil resistance measurements are accurate and reliable. Temperature-related fluctuations are normal, but extreme swings indicate a problem.
How to Test Your Ignition Coil with a Multimeter
What You Will Need
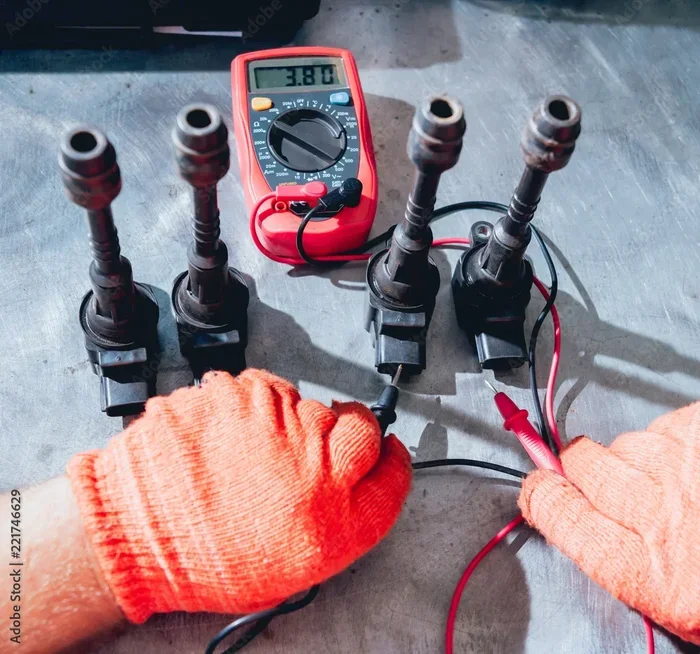
Testing your ignition coil is straightforward and requires only a few tools. You will need a digital multimeter set to the ohms or resistance setting. Make sure your multimeter is rated for the range you are testing. A basic digital multimeter that reads up to 20,000 ohms will work for most coils. You should also have your vehicle service manual handy to look up the factory specifications. Wearing gloves and eye protection is always a good idea when working around the ignition system. Keep your hands dry and work on a cool engine for the most accurate results.
A quality digital multimeter is one of the most useful tools any car owner can own. It costs very little and provides incredibly valuable diagnostic information. You can use it to test not just your coil but also your battery, alternator, and other electrical components. Make sure your multimeter has fresh batteries and is calibrated correctly. A faulty meter will give you false readings and lead you down the wrong path. Take the time to verify your tools before you start any ignition coil testing job.
Step-by-Step Testing Process
Start by locating your ignition coil or coil pack. On older vehicles, you will find a single coil with a distributor. On modern engines, you likely have a coil-on-plug setup with individual coils for each cylinder. Disconnect the electrical connector from the coil. Set your multimeter to the lowest ohms setting. Touch the probes to the primary winding terminals and record the reading. Now move the probes to the secondary winding terminals, which are typically the coil output and the center terminal. Record that reading as well. Compare both numbers to the factory specifications. If either reading is outside the acceptable range, your coil is faulty.
Here is a quick checklist to follow during testing:
- Turn the ignition off and remove the key.
- Disconnect the electrical connector from the coil.
- Set your multimeter to the ohms setting.
- Test the primary winding first and record the value.
- Test the secondary winding and record that value.
- Compare both readings to the factory specifications.
- Repeat the test if you get an unexpected reading.
Following these steps carefully ensures you get reliable results every time. A coil ohm test should only take about 10 to 15 minutes. If your readings are within spec but you still have symptoms, the problem may lie elsewhere in the ignition system. Always check spark plug wires, connectors, and the spark plugs themselves before condemning the coil.
Common Mistakes to Avoid During Testing
One of the biggest mistakes is testing the coil while it is still hot. Heat changes the resistance and gives you inaccurate numbers. Another common error is not disconnecting the electrical connector before testing. This can lead to false readings because you are measuring the circuit rather than the coil alone. Some people also forget to check the spark plug wires and connectors. A problem there can mimic a bad coil. Always inspect the entire ignition system before replacing any parts. And never assume a new coil is good just because it is new. Sometimes ignition coil replacement parts are defective right out of the box.
Another mistake is not testing all coils in a coil pack. If one coil is bad, the others may be close to failing too. Replace the whole pack if multiple coils show borderline readings. This saves you from coming back for a second repair. Also, do not ignore corrosion on the connectors. Clean contacts ensure accurate readings and reliable operation. Taking a few extra minutes to do the job right pays off in the long run.
Signs Your Ignition Coil Is Failing
Engine Misfires and Rough Idle
The most common sign of a failing coil is an engine misfire. You may feel a shaking or vibrating sensation when idling. The engine might stumble during acceleration. A misfire happens when the coil cannot deliver enough voltage to create a proper spark at the plug. This means one or more cylinders are not firing correctly. Over time, misfires can damage your catalytic converter and other expensive components. If you notice rough idle or hesitation, it is time to check your ignition coil symptoms and run a coil ohm test.
Misfires can also trigger your check engine light. The engine control module detects the misfire through its sensors and stores a trouble code. Common codes related to coil issues include P0300 through P0308, which indicate misfires in specific cylinders. If you see any of these codes, testing the ignition coil should be your first step. A simple ohms reading can often confirm whether the coil is the source of the problem.
Hard Starting and No-Start Conditions
A weak or failed coil can make your car very hard to start or prevent it from starting altogether. When the coil cannot produce enough voltage, the spark is too weak to ignite the fuel mixture. This is especially noticeable when the engine is cold. If you are struggling to start your vehicle, a failing coil could be the reason. If you have ever wondered whether your Toyota Highlander will start with just a key, you know that ignition system health is critical for reliable starting. A bad coil can turn a simple start into a frustrating experience every single morning.
Hard starting is one of the most overlooked symptoms of a failing coil. Many people assume the battery or starter is to blame. While those components can certainly cause starting problems, a weak coil is often the real culprit. The coil may still produce enough voltage to keep the engine running once it is started, but it cannot provide the strong spark needed for a quick, reliable start. This is especially true in cold weather when the air-fuel mixture is harder to ignite. If your car cranks slowly or takes multiple attempts to fire up, do not overlook the ignition coil as a possible cause.
Poor Fuel Economy and Power Loss
A failing coil does not just cause starting problems. It also hurts your fuel economy and engine power. When the spark is weak or inconsistent, the air-fuel mixture does not burn completely. This means wasted fuel and reduced power. You might notice that your car feels sluggish during acceleration. Your fuel mileage may drop noticeably. These symptoms are easy to overlook because they develop gradually. By the time you notice a significant change, the coil may already be severely damaged. Regular ignition coil testing can catch problems early before they affect your wallet.
Poor fuel economy is one of those symptoms that people tend to accept as normal. They assume gas prices are just high and move on. But a significant drop in mileage is often a sign of a mechanical problem. A failing coil causes incomplete combustion, which wastes fuel and increases emissions. If you are filling up more often than usual, it is worth checking your ignition system. A simple coil ohm test could reveal the problem and save you money at the pump.
What Causes Ignition Coil Failure?
Heat and Vibration Damage
Your ignition coil sits right next to your engine. It endures extreme heat and constant vibration every time you drive. Over time, this harsh environment breaks down the internal wiring and insulation. Heat is the number one killer of ignition coils. The insulation between the primary and secondary windings can melt, causing a short circuit. Vibration can crack the coil housing and damage internal connections. This is why it is important to check your coil regularly, especially if you drive in hot climates or on rough roads.
Underhood temperatures can reach extreme levels, especially in summer or in vehicles with limited airflow around the coil. The ignition coil is designed to withstand normal operating temperatures, but sustained extreme heat accelerates wear. Vibration from the engine can also work loose electrical connections over time. This creates intermittent problems that are difficult to diagnose. If you notice your symptoms come and go, heat and vibration damage may be the cause. Inspecting the coil mount and connectors regularly can help you catch these issues early.
Age and Wear Over Time
Like all car parts, ignition coils wear out over time. The average coil lifespan is around 100,000 miles, but this varies by vehicle and driving conditions. As the coil ages, the wire insulation degrades. The windings may develop micro-breaks that worsen over time. Eventually, the coil simply cannot produce enough voltage to fire the plugs reliably. If your vehicle has high mileage and you have not replaced the coils, it is a good idea to test them. Preventive ignition coil replacement can save you from unexpected breakdowns.
Age-related failure is gradual and often goes unnoticed until the coil completely stops working. The insulation breaks down slowly, allowing tiny amounts of current to leak between the windings. This leakage reduces the voltage available for spark plug firing. You may not notice a significant change in performance until the damage is quite advanced. This is why regular ignition coil testing is so important, especially on higher-mileage vehicles. Catching a failing coil early means replacing it before it leaves you stranded.
Electrical Overload and Voltage Spikes
Your vehicle’s electrical system is not always as stable as it should be. Voltage spikes from the alternator or a failing battery can stress the ignition coil. These spikes can gradually break down the insulation in the windings. Water intrusion is another common cause of electrical damage. If moisture gets inside the coil or connector, it can cause corrosion and short circuits. Keeping your electrical system in good shape helps protect your ignition coil from premature failure.
Voltage spikes can happen for many reasons. A failing voltage regulator, a bad alternator diode, or even jumping your vehicle incorrectly can send damaging voltage through the ignition system. Water intrusion often happens through cracked coil housings or corroded connectors. Road salt and moisture are particularly damaging in colder climates. If you live in an area with harsh winters, inspect your ignition coils and connectors more frequently. Keeping the electrical system clean and dry goes a long way toward extending the life of your automotive ignition coil.
When to Replace Your Ignition Coil
Testing Results That Mean Replacement
If your ohms reading falls outside the factory specifications, replacement is the right call. A primary winding reading of zero or infinite ohms means the coil is shorted or open. A secondary winding reading that is significantly below 6,000 ohms or above 15,000 ohms also indicates failure. Even if the readings are within range but you are experiencing symptoms, the coil may be failing intermittently. Intermittent failures are tricky because the coil may test fine when cool but fail when hot. In these cases, a road test or heat-based testing method may be needed to confirm the problem.
Sometimes the numbers look okay but the coil is still causing problems. This happens when the coil fails under load but passes a static test. If you have symptoms like misfires or hard starting and your multimeter reading looks normal, do not assume the coil is fine. Consider having a professional perform a more advanced test. A load test can reveal problems that a simple static ohms reading cannot. Trust your symptoms as much as your test results.
Parts Availability and Timing
When you decide to replace your coil, timing matters. Sometimes the part you need is not immediately available. Car parts can be on backorder for days or even weeks, depending on the model and supplier. It is always a good idea to check availability before you commit to a repair appointment. Having the part in hand before you start the job keeps you from paying for labor while waiting. Plan ahead and order your replacement coil as soon as you confirm the diagnosis.
Backorders are more common than many people realize. Popular models and older vehicles are especially prone to parts delays. If you need your car back on the road quickly, check availability before scheduling the repair. Some dealerships can order parts overnight, while others may need to wait for shipments. Having a backup plan, such as a loaner vehicle or alternative transportation, can save you from being stranded. Good planning and early ordering make the ignition coil replacement process much smoother.
Cost Considerations
The cost of replacing an ignition coil varies widely. A single coil pack can cost anywhere from 30 to 150 dollars for parts alone. If you have a coil-on-plug setup, you may need to replace one or multiple coils. Labor costs are typically reasonable since the coils are accessible on most modern engines. Doing the replacement yourself can save you significant money. Just make sure you follow the proper procedure and use the right tools. A quality digital multimeter is your best investment for diagnosing and confirming the fix.
Replacing a coil yourself is one of the easiest DIY repairs you can do. Most coils are held on with a single bolt or clip and plug into an electrical connector. You can usually complete the job in under 30 minutes per coil. The savings compared to a shop labor charge can be substantial. Just make sure you purchase the correct part for your vehicle. Using the wrong coil can lead to poor performance and further damage. When in doubt, consult your vehicle service manual or a trusted mechanic.
Understanding how many ohms should a good ignition coil have empowers you to take control of your vehicle’s maintenance. A healthy primary winding reads between 0.4 and 2.0 ohms, and a healthy secondary winding reads between 6,000 and 15,000 ohms. These numbers are your first line of defense against engine misfires, hard starts, and poor performance. Regular ignition coil testing with a multimeter takes only minutes and can save you hundreds of dollars in repairs. Do not wait for a breakdown to check your coil. Make it part of your routine maintenance schedule and keep your ignition system running strong for years to come.
Frequently Asked Questions
Can I test an ignition coil without a multimeter?
You can perform some visual checks, such as looking for cracks, burn marks, or corrosion on the coil and connectors. However, a multimeter is the only reliable way to measure the actual ohms reading and determine if the winding resistance is within spec. Without a multimeter, you are essentially guessing, which can lead to unnecessary part replacements or missed diagnoses.
What happens if I drive with a bad ignition coil?
Driving with a bad coil can cause engine misfires, rough running, and loss of power. Over time, unburned fuel from misfires can damage your catalytic converter, which is an expensive repair. A failing coil can also cause your vehicle to stall unexpectedly, which is dangerous on the road. If you suspect your coil is failing, test it as soon as possible and replace it if needed.
Can a bad ignition coil cause a check engine light?
Yes, absolutely. When a coil fails to produce a strong enough spark, the engine misfires. Your vehicle’s computer detects these misfires through its sensors and triggers the check engine light. Common trouble codes include P0300 through P0308, which indicate misfires in specific cylinders. A simple ignition coil testing procedure can often confirm whether the coil is the cause of the light.
How often should I test my ignition coil?
There is no set schedule for testing your coil, but it is a good idea to test it during routine maintenance or whenever you experience symptoms like misfires, hard starting, or poor fuel economy. If your vehicle has over 80,000 miles, testing the coil annually is a smart preventive measure. Regular ignition coil testing helps you catch problems early before they turn into costly repairs.
Is it safe to drive with a failing ignition coil?
It is not recommended. A failing coil can cause your engine to misfire or stall unexpectedly, which is dangerous especially at highway speeds or in heavy traffic. Additionally, continued driving with a bad coil can damage other components like the catalytic converter. If you notice ignition coil symptoms such as rough idle or hesitation, have the coil tested and replaced promptly.
Can I replace just one ignition coil?
Yes, you can replace just the faulty coil. However, if your vehicle uses a coil pack that serves multiple cylinders, you may want to replace the entire pack. If one coil in the pack has failed, the others are likely close to the end of their lifespan too. Replacing the whole pack at once can save you from a second repair job. Always check the condition of all coils during any ignition coil replacement.