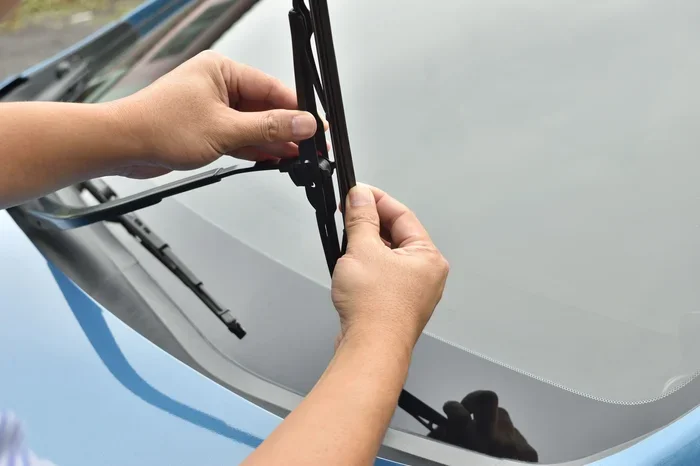
How Do You Remove Windshield Wiper Pins Without Damage
Removing windshield wiper pins doesn’t have to be scary or complicated. With the right tools and a little patience, you can pop out those pins safely and keep your windshield wiper blades working like new. This guide walks you through every step so you never have to worry about scratching your windshield or breaking the clip.
Windshield wiper pins might be small, but they play a huge role in keeping your view clear on rainy days. If you have ever tried to change your wiper blades and got stuck on a stubborn pin, you already know how frustrating it can be. The good news is that removing these pins is actually pretty simple once you know what you are doing.
In this guide, we will show you exactly how to remove windshield wiper pins without causing any damage. Whether you are dealing with a J-hook style, a side pin, or a bayonet connector, we have got you covered. No special skills needed — just follow along and you will be swapping out your rubber wiper in no time.
So why does this matter? Your wiper pins hold the blade firmly against the windshield. When they wear out or get stuck, your wipers start leaving streaks, making noise, or worse — they can scratch your glass. Taking care of this small car maintenance task now can save you from costly repairs later. Let us dive in.
Key Takeaways
- Wiper pins come in different types: J-hook, side pin, and bayonet styles each need a slightly different removal approach.
- You only need basic tools: A flat-head screwdriver, pliers, and a cloth are usually enough to get the job done safely.
- Never force the pin out: Applying too much pressure is the number one cause of windshield damage and broken clips.
- Regular wiper maintenance extends blade life: Cleaning and inspecting your pins and blades every few months saves money in the long run.
- Replace worn pins immediately: A damaged pin leads to streaky wipes, noise, and poor visibility during rain or snow.
- You can do this at home: No mechanic or shop visit needed — just follow our simple instructions.
📑 Table of Contents
- Understanding Windshield Wiper Pin Types
- Tools You Will Need for the Job
- Step-by-Step Guide to Removing Wiper Pins Safely
- Common Mistakes People Make When Removing Wiper Pins
- How to Prevent Wiper Pin Damage Over Time
- When Should You Replace Wiper Pins Instead of Just the Blade?
- Pro Tips for a Smooth Wiper Pin Removal
- Final Thoughts on Removing Windshield Wiper Pins
Understanding Windshield Wiper Pin Types
Before you grab any tools, it helps to know what kind of pin you are dealing with. Not all wiper connectors are the same. Each type has a unique design that determines how you remove it. Let us break down the most common ones you will encounter.
J-Hook Wiper Pins
The J-hook style is the most common type found on older vehicles and many budget windshield wiper blades. It gets its name from the J-shaped hook at the bottom of the wiper arm. The blade slides onto the hook and locks into place with a small pin or clip. To remove a J-hook pin, you simply press the release tab or slide the clip out from the side. These are the easiest to work with, but the pin can still get stuck if it has been exposed to road grime and moisture for a long time.
Side Pin Wiper Connectors
Side pin connectors use a small metal pin on the side of the wiper arm. The blade adapter slides over this pin and snaps into place. You will often find these on modern vehicles. The pin is held by a spring clip, and you need to squeeze or push the clip inward before sliding the blade off. These can be a little trickier than J-hook styles, but they are still very manageable at home.
Bayonet Style Wiper Pins
Bayonet pins are the twist-and-lock style connectors. You push the blade upward and twist it slightly to release it from the arm. These are common on many European and Japanese vehicles. The bayonet design is actually quite secure, which is great for driving in harsh weather. But when it comes time to remove the blade, you need to know the exact release motion — push up and twist. If you try to pull straight out, you might damage the adapter or the wiper arm itself.
Quick Adapter Systems
Many newer vehicles use a quick adapter system that lets you swap blades without touching any pins at all. The entire adapter pops out with a simple push button or slide mechanism. If your vehicle has this system, you are in luck — removing wiper blades becomes a breeze. Just check your owner’s manual to confirm the type before you start.
Tools You Will Need for the Job
One of the best things about removing wiper pins is that you do not need fancy equipment. Most of the tools you already have lying around the house. Here is a simple list of what you should gather before you begin.
- Flat-head screwdriver: This works great for gently prying out side pin clips and J-hook releases.
- Needle-nose pliers: Handy for gripping small pins or clips that are hard to reach with your fingers.
- Soft cloth or microfiber towel: Use this to protect your windshield from scratches while you work.
- Rubber gloves: Optional, but they give you a better grip and keep your hands clean.
- Penetrating oil or WD-40: If the pin is stuck, a little lubricant can help free it up without force.
- Replacement wiper blades: Make sure you have the correct size for your vehicle before you start.
Having everything ready before you start makes the whole process faster and smoother. You do not want to be standing at the windshield halfway through, searching for a screwdriver.
Step-by-Step Guide to Removing Wiper Pins Safely
Now that you know what type of pin you have and what tools you need, let us walk through the actual removal process. Follow these steps carefully and you will never damage your wiper assembly again.
Step 1: Lift the Wiper Arm Away from the Windshield
Start by lifting the wiper arm away from the windshield. Gently pull it up until it stands upright. Be careful not to let the arm snap back onto the glass — that can cause scratches or even cracks. If the arm keeps snapping down, place a folded cloth between the arm and the windshield for cushioning.
Step 2: Locate the Pin or Clip Mechanism
Look closely at the connection point where the wiper blade meets the arm. You should see the pin, clip, or adapter. Identify which type of connector you have based on what we covered earlier. Take a moment to study how it is seated before you try to remove anything.
Step 3: Release the Clip or Pin
For J-hook styles, look for a small tab on the side of the connector. Press it inward with your finger or gently with a flat-head screwdriver. For side pin connectors, squeeze the spring clip inward and slide the blade down. For bayonet styles, push the blade up and give it a slight twist. The key here is gentle, steady pressure. Never use excessive force.
Step 4: Slide the Blade Off the Arm
Once the clip or pin is released, slide the wiper blade off the arm. It should come off smoothly with little resistance. If it feels stuck, stop and check if you missed a release mechanism. Applying a little penetrating oil and waiting a few minutes can help loosen a stubborn pin.
Step 5: Inspect the Pin and Adapter
Now that the blade is off, take a close look at the pin and adapter. Check for rust, bending, or wear. A damaged pin will not hold the new blade securely. If the pin looks worn or corroded, it is a good idea to replace it along with the blade. This is also a great time to clean any dirt or buildup off the wiper arm.
Common Mistakes People Make When Removing Wiper Pins
Even with the best intentions, it is easy to make mistakes when removing wiper pins. These errors can lead to damaged pins, scratched windshields, or broken wiper arms. Let us look at the most common ones so you can avoid them.
Forcing the Pin Out
The biggest mistake is using too much force. If the pin does not come out easily, it is probably because it is stuck or you have not found the release mechanism yet. Forcing it can bend the pin, break the clip, or scratch your windshield. Always work slowly and gently.
Using the Wrong Tools
Some people reach for pliers or screwdrivers that are too big or too aggressive. Using a metal tool directly on the wiper arm without a cloth can leave marks or scratches. Always wrap your tools in a soft cloth and use the right size for the job.
Skipping the Lubricant Step
If a pin is stuck, skipping the lubricant and just pulling harder is a recipe for disaster. A few sprays of WD-40 or a drop of penetrating oil can make a huge difference. Wait a minute or two for the lubricant to work before trying again.
Not Knowing Your Connector Type
Every wiper connector works differently. If you assume your side pin is a J-hook and try to pull it straight out, you will struggle — and probably damage something. Always identify the connector type first by checking your vehicle manual or looking closely at the mechanism.
Removing Wipers in the Wrong Position
Some people try to remove the blade while the wiper arm is still lying flat against the windshield. This puts pressure on the glass and makes it hard to access the pin properly. Always lift the arm upright first.
How to Prevent Wiper Pin Damage Over Time
Prevention is always better than repair, and the same goes for your wiper pins. A few simple habits can keep your windshield wiper blades and pins in great shape for years.
- Clean your wiper blades regularly: Wipe the rubber edge and the adapter with a damp cloth every few weeks. Dirt and grit build up fast and can work their way into the pin mechanism.
- Lift wipers off the windshield in winter: Ice and frost can freeze the wiper blade to the glass. When you try to remove it, the force can bend or break the pin. Lifting the blades up before a freeze prevents this.
- Replace blades on schedule: Most experts recommend replacing wiper blades every six to twelve months. Worn blades put extra stress on the pins and connectors.
- Use quality replacement parts: Not all wiper blades are created equal. Premium blades often have better adapters and more durable pins. If you are unsure which brand to choose, check out our guide on Are Toyota Wiper Blades Good for expert recommendations.
- Avoid running wipers on a dry windshield: This creates friction that wears down both the rubber and the pin connection over time. Always use wiper fluid when cleaning your windshield.
Taking these small steps can significantly extend the life of your wiper system. And when the time does come to replace a blade, the process will be much easier if your pins are in good condition.
When Should You Replace Wiper Pins Instead of Just the Blade?
Sometimes the blade is fine but the pin itself is the problem. How do you know when it is time to replace the pin rather than just the rubber? Here are the signs to watch for.
If your wipers make a loud clicking or snapping noise when they move, the pin might be loose or bent. If the blade wobbles or skips across the windshield even after installing a new blade, the adapter or pin could be worn out. And if you notice rust or corrosion on the pin itself, it is definitely time for a replacement. You can buy replacement pins at most auto parts stores for just a few dollars. Some vehicles also allow you to replace just the adapter clip, which is an even cheaper fix.
If you are not sure whether your issue is with the pin or the blade, it is worth visiting a trusted mechanic or checking out a guide on replacing just the rubber wiper to help you diagnose the problem.
Pro Tips for a Smooth Wiper Pin Removal
Here are some expert tips that make the whole process easier and faster. These are the kind of tricks that experienced mechanics use every day.
- Warm up the pin first: On cold days, the metal pin can contract and become extra tight. Running your car for a few minutes or using a hairdryer on a low setting can loosen things up.
- Take a photo before removing: This sounds simple, but a photo gives you a reference point for how everything was seated. It makes reinstallation much easier.
- Work on one wiper at a time: Removing both wipers at once can lead to confusion about which blade goes where. Take it one arm at a time.
- Keep the old pin if it is still in good shape: You never know when you might need it for reference or if a replacement part is not available.
- Check your blade size: Before ordering new blades, confirm the correct size for your vehicle. Using the wrong size can put unnecessary stress on the pins and connectors.
These tips might seem small, but they make a big difference in how smoothly the job goes. The more prepared you are, the less likely you are to run into problems.
Final Thoughts on Removing Windshield Wiper Pins
Removing windshield wiper pins without damage is something anyone can learn to do. It just takes a little knowledge, the right tools, and a patient approach. Whether you are dealing with a J-hook, side pin, or bayonet connector, the process follows the same basic principles — identify the type, release the clip gently, and slide the blade off carefully.
Regular maintenance of your wiper pins and blades keeps your windshield clear and your visibility safe. It is one of those small car maintenance tasks that pays off big time. And the best part is that you can do it yourself at home in just a few minutes, saving money on mechanic visits.
Next time your wipers start streaking or making noise, do not ignore it. Grab your tools, follow our guide, and get those pins removed safely. Your windshield — and your wallet — will thank you.
For more helpful tips on wiper care and replacement, check out our articles on Does Autozone Change Wiper Blades For Free and Do More Expensive Wiper Blades Make A Difference to help you make the best choice for your vehicle.
Frequently Asked Questions
Can I remove wiper pins without any tools?
Yes, for most J-hook and quick-connect styles, you can remove the pin with just your fingers. However, having a flat-head screwdriver and pliers on hand makes the job easier, especially for side pin and bayonet connectors that may be stuck from age or grime.
What happens if I break a wiper pin while removing it?
If the pin breaks, you will need to replace it before installing new wiper blades. A broken pin can cause the blade to wobble or detach while driving, which is dangerous. Replacement pins are inexpensive and available at most auto parts stores.
How often should I inspect my wiper pins?
It is a good idea to inspect your wiper pins and blades every three to six months. Regular checks help you catch wear, rust, or damage early before it leads to streaking, noise, or windshield scratches.
Can I use the same wiper pin with a different brand of blade?
Usually yes, as long as the blade adapter matches the pin style on your wiper arm. Most aftermarket blades use standard adapter sizes, but it is always smart to verify compatibility before purchasing.
Is it safe to remove wiper pins in cold weather?
It is safe, but cold weather can make pins more brittle and stuck. Warm up the area first with your car’s defroster or a hairdryer, and apply a small amount of lubricant if needed. Never force a pin out in freezing conditions.
Should I lubricate wiper pins after removing them?
Yes, applying a thin layer of silicone lubricant to the pin and adapter before reinstalling helps ensure smooth operation and prevents corrosion. This simple step can extend the life of your wiper system significantly.