Install a Front License Plate on Alfa Romeo Stelvio
Installing a front license plate on an Alfa Romeo Stelvio is a simple DIY project that takes under 30 minutes. You need basic tools, a license plate bracket designed for the Stelvio, and a few mounting bolts. This guide walks you through every step, from gathering your mounting hardware to avoiding common mistakes that cause rattles or damage.
Key Takeaways
- You can do it yourself: No mechanic is needed. Most Stelvio owners finish in 20–30 minutes with basic tools.
- The right bracket matters: Using a Stelvio-specific license plate bracket ensures a clean, flush fit on the front bumper.
- Avoid common mistakes: Over-tightening bolts, using the wrong hardware, and skipping thread-locking compound cause problems down the road.
- Professional installation costs vary: Dealers may charge diagnostic fees for this simple job, so DIY can save you money.
- Maintenance keeps it secure: Periodically check your bolts and brackets to prevent rattles or loosening over time.
- Legal compliance is key: Most states require both front and rear plates, so proper installation keeps you road-legal.
📑 Table of Contents
- How to Install a Front License Plate on an Alfa Romeo Stelvio
- What You Need Before You Start
- Step-by-Step Installation Guide
- Common Mistakes to Avoid
- DIY Installation vs. Professional Installation
- Maintaining Your Front License Plate Setup
- Why the Alfa Romeo Stelvio Deserves the Right Bracket
- Frequently Asked Questions
- Conclusion
How to Install a Front License Plate on an Alfa Romeo Stelvio
Your Alfa Romeo Stelvio turns heads wherever it goes. But if you live in a state that requires a front license plate, that sleek front bumper needs a plate mount. And if you have never done it before, the process can feel a little intimidating.
Here is the good news. Installing a front license plate on a Stelvio is one of the easiest car maintenance DIY projects you can tackle. You do not need special skills, expensive tools, or a trip to the mechanic. In this guide, we walk you through every single step. By the time you finish reading, you will know exactly what to buy, what to do, and how to avoid the mistakes that trip up most people.
Whether you just bought a new Stelvio or have been driving one for years, this guide covers everything. We will talk about the tools you need, the different bracket options available, and how to make the installation look clean and professional. Let us get started.
What You Need Before You Start
Before you touch your Stelvio’s front bumper, gather everything you need. Working without the right tools will slow you down and could damage the car. Here is your checklist.
Tools and Materials
- Alfa Romeo Stelvio front license plate bracket — Make sure it is designed specifically for the Stelvio. Generic brackets often do not line up correctly with the bumper cutouts.
- Mounting bolts or screws — Most Stelvio brackets use M8 bolts. Check your bracket kit to confirm the size.
- Ratchet and socket set — A 10mm or 12mm socket works for most Stelvio bracket bolts.
- Phillips and flathead screwdrivers — For any clips or screws you need to remove first.
- Thread-locking compound — This prevents bolts from vibrating loose over time. A small bottle of Loctite 242 works great.
- Microfiber cloth — For cleaning the bumper surface before mounting.
- Measuring tape — To center the bracket perfectly.
- Masking tape — Helps mark drill points if your bracket requires drilling.
Where to Buy the Parts
You have a few options for getting your license plate bracket. The Alfa Romeo dealer will sell an OEM bracket, but it often costs more. Aftermarket brackets from brands like Putco, Reese, or AKE Sports fit the Stelvio well and cost less. You can also find universal brackets, but we strongly recommend a Stelvio-specific mount for the cleanest look. If you order online, keep in mind that car parts can sometimes be on backorder, so plan ahead and order a few days before you want to install.
Step-by-Step Installation Guide
Now that you have your tools and bracket ready, let us install that front plate. Follow these steps carefully, and your Stelvio will look factory-installed in no time.
Step 1: Clean the Front Bumper Area
Start by cleaning the area on the front bumper where the bracket will mount. Use a microfiber cloth with a little mild car cleaner. You want the surface free of dirt, grease, and debris. This helps the bracket sit flush and prevents any contamination from getting trapped under the mount.
Step 2: Position the Bracket
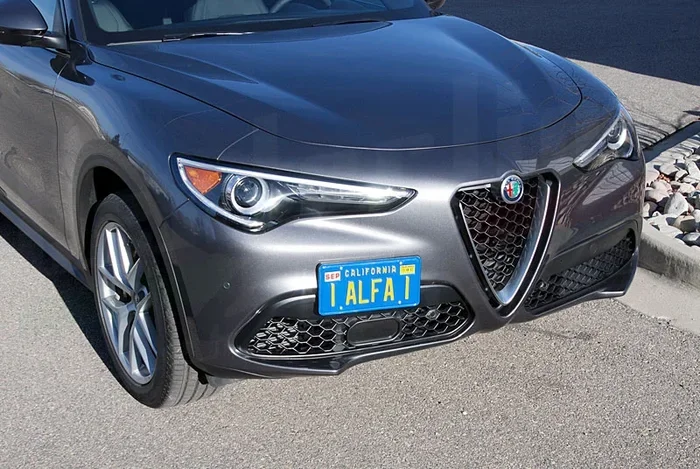
Hold the bracket against the front bumper. Most Stelvio brackets mount below the grille or on the lower bumper section. Use a measuring tape to center the bracket left to right. Hold it steady and check from the side to make sure it sits evenly. Use masking tape to mark the bolt hole positions on the bumper.
Step 3: Remove Any Necessary Trim or Covers
Depending on your Stelvio trim, you may need to remove a small plastic cover or clip near the bumper to access the mounting points. Use a flathead screwdriver gently to pop off any clips. Be careful not to crack the plastic. If you are unsure which clips to remove, check your owner’s manual for the front bumper section.
Step 4: Drill or Bolt the Bracket In Place
If your bracket uses existing bumper holes, simply align the bracket and start threading the bolts by hand. If your bracket requires new holes, use a drill with the appropriate bit size. Go slow and steady. Mark your drill points with the masking tape, drill pilot holes first, then widen to the final size. Always wear safety glasses when drilling.
Step 5: Secure the Bracket with Bolts
Once the bracket is positioned, thread all the bolts in hand first. This prevents cross-threading. Then use your ratchet and socket to tighten them. Do not over-tighten. Snug is good. Too tight can crack the bumper or strip the threads. Apply a small amount of thread-locking compound to each bolt before final tightening.
Step 6: Attach the License Plate
Place the license plate against the bracket. Insert the remaining bolts or screws through the plate holes and into the bracket. Tighten them evenly, working in a cross pattern — left, right, top, bottom — to ensure the plate sits flat and level.
Step 7: Double-Check Everything
Give the plate a gentle shake. It should feel solid with no movement. Check that the plate is centered and level. If you notice any rattling or looseness, tighten the bolts slightly. Also, make sure the plate does not block any front license plate lights or sensors on the bumper.
And that is it. You just installed a front license plate on your Alfa Romeo Stelvio. It should take about 20 to 30 minutes if you have all your tools ready.
Common Mistakes to Avoid
Even simple projects go wrong when you skip steps or use the wrong approach. Here are the most common mistakes Stelvio owners make when installing a front license plate.
- Using the wrong bracket size. Not all brackets fit the Stelvio the same way. A bracket designed for a different vehicle will look crooked and may not align with bumper holes. Always buy a bracket listed as compatible with the Alfa Romeo Stelvio.
- Over-tightening the bolts. This is the number one cause of bumper damage during plate installation. The bolts only need to be snug. If you crank them down hard, you risk cracking the plastic or stripping the threads in the bumper.
- Skipping thread-locking compound. The Stelvio sits low and gets a lot of road vibration. Without thread-locker, your bolts can loosen over time, leading to a wobbly plate or, worse, a plate that falls off while driving.
- Forgetting to check state laws. Not every state requires a front plate. Before you drill holes in your bumper, confirm your state’s license plate requirements. Some states like Florida, Texas, and Arizona do not require front plates, while others like New York and California do.
- Ignoring the license plate lights. Your Stelvio may have lights integrated into the bumper for the front plate. Make sure your bracket and plate do not block these lights. Visibility matters for safety and for passing inspections.
- Rushing the alignment. A crooked plate looks terrible and can catch wind, causing vibration at highway speeds. Take the extra two minutes to measure and center the bracket properly.
DIY Installation vs. Professional Installation
Now you might be wondering whether you should do this yourself or pay someone else. Let us break down both options.
DIY Installation
DIY installation is the most popular choice for Stelvio owners. The reasons are simple. It is fast, it is free (beyond the cost of the bracket and bolts), and it gives you full control over how it looks. Most people finish in under 30 minutes. If you have ever changed a tire or installed a phone mount, you have the skills needed for this job.
Professional Installation
If you prefer not to DIY, you can have a dealership or independent shop handle the installation. However, keep in mind that dealers often charge diagnostic fees for even minor work. A simple license plate mount that takes 20 minutes could cost you $50 to $150 in labor at a dealership. Independent shops tend to be cheaper, but you are still paying for someone else to do a task that takes almost no skill.
Which Option Is Right for You?
If you are comfortable with basic car tasks and want to save money, go DIY. If you are worried about damaging your bumper or simply do not want to spend the time, paying a professional is a perfectly valid choice. Either way, make sure the person doing the job uses the correct bracket and hardware for your specific Stelvio model year.
Maintaining Your Front License Plate Setup
Once your front plate is installed, a little maintenance goes a long way. Here is how to keep everything looking and functioning great.
- Check your bolts monthly. Road vibration loosens bolts over time. Every few weeks, give each bolt a quick tug to make sure it is still tight. If any feel loose, retighten them with your ratchet.
- Clean the bracket and plate regularly. Road salt, dirt, and grime build up on the bracket and plate. Wipe them down with a damp microfiber cloth during your regular car washes. This prevents corrosion and keeps the finish looking new.
- Inspect the bumper area. Every few months, look at the bumper around the bracket. Check for any cracks, stress marks, or paint damage. Catching these early prevents bigger problems later.
- Replace worn hardware. If any bolt or screw shows signs of rust or damage, replace it immediately. Do not reuse stripped or corroded fasteners. New hardware is cheap and ensures a secure mount.
- Remove the plate for winter storage. If you store your Stelvio during winter, consider removing the front plate and bracket. This eliminates any stress on the bumper from ice, snow, and road salt. When spring comes, reinstall with fresh thread-locker for a secure fit.
Why the Alfa Romeo Stelvio Deserves the Right Bracket
The Stelvio is a beautiful machine. It has sleek lines, a sporty stance, and an Italian design that stands out in any parking lot. A poorly fitting license plate bracket can ruin that look. A universal bracket that sticks out or sits crooked makes the front end look aftermarket and unpolished. A Stelvio-specific bracket, on the other hand, hugs the bumper contour and blends in seamlessly. The difference is night and day.
When you take the time to use the right bracket and install it correctly, the result looks like it came from the factory. That is exactly what you want on a car like the Stelvio. It shows pride in the vehicle and attention to detail. Plus, a secure bracket means no annoying rattles on those long highway drives through the mountains — something every Stelvio owner will appreciate.
Frequently Asked Questions
Do I need a special bracket for the Alfa Romeo Stelvio?
Yes, you should use a bracket designed specifically for the Stelvio. The front bumper on the Stelvio has unique cutouts and mounting points that generic brackets do not align with. A Stelvio-specific bracket ensures a clean, flush fit that looks factory-installed and avoids the need for drilling or modifying the bumper.
Can I install the front license plate myself, or do I need a mechanic?
You can absolutely install it yourself. The process requires only basic tools like a ratchet, socket, and screwdriver, and most owners complete the job in 20 to 30 minutes. If you have ever mounted a phone holder or changed a tire, you have the skills needed. Only consider a mechanic if you are uncomfortable working on your car or worried about bumper damage.
Will installing a front license plate bracket damage my Stelvio’s bumper?
Not if you do it correctly. Using the existing bumper holes and the right bracket causes no damage. If your bracket requires drilling, use a pilot hole and the correct bit size to avoid cracks. Always apply thread-locking compound to prevent vibration-related loosening, which is the real culprit behind long-term bumper stress.
How much does it cost to have a dealer install a front license plate on a Stelvio?
Costs vary, but dealerships often charge a diagnostic fee plus labor, which can range from $50 to $150 for such a simple job. The bracket itself may cost an additional $30 to $80 if purchased from the dealer. For a fraction of that cost, you can buy an aftermarket bracket and install it yourself in under half an hour.
Do all states require a front license plate on the Stelvio?
No, not all states require a front plate. States like Texas, Florida, Arizona, and several others only require a rear plate. Before you install anything, check your state’s specific license plate laws. Installing a front plate on a vehicle in a no-front-plate state is unnecessary and could affect the Stelvio’s aerodynamic design and bumper aesthetics.
What should I do if my license plate rattles after installation?
A rattling plate usually means the bolts are loose or the bracket is not seated properly. First, check and tighten all bolts. If the rattle persists, remove the bracket and apply a rubber grommet or small piece of weatherstripping between the bracket and bumper. This dampens vibration and eliminates the noise. Also make sure you used thread-locking compound during the original install.
Conclusion
Installing a front license plate on an Alfa Romeo Stelvio is one of those small car maintenance tasks that makes a big difference. It keeps you legal, protects your investment, and keeps your Stelvio looking its best. With the right bracket, a handful of basic tools, and this guide, you can finish the job in under 30 minutes without any help.
Remember to use a Stelvio-specific bracket, apply thread-locking compound to every bolt, and take your time with the alignment. Avoid the common mistakes we covered, and your front plate will look clean and stay secure for years. Whether you choose to DIY or pay a professional, the most important thing is that the installation is done right. Your Stelvio deserves that level of care.
Now go grab your tools, get that bracket mounted, and hit the road with confidence. Your Stelvio is ready to turn heads — front plate and all.