Harley Pushrod Adjustment Chart Guide for Beginners
The Harley Pushrod Adjustment Chart is an essential reference for any Harley owner who wants to keep their engine running smoothly. This guide walks you through reading the chart, adjusting your pushrods correctly, and avoiding costly mistakes. Whether you ride a Sportster, Dyna, or touring model, proper pushrod adjustment extends engine life and boosts performance.
If you own a Harley-Davidson, you already know that keeping your bike in top shape is part of the riding experience. One of the most important maintenance tasks you can do is adjusting your pushrods. A Harley Pushrod Adjustment Chart makes this job much easier, especially if you are new to engine work. In this guide, we will walk you through everything you need to know. We will cover what pushrods do, how to read the adjustment chart, and the step-by-step process to get it right. By the end, you will feel confident tackling this job in your own garage.
Pushrod adjustment might sound intimidating, but it is really just about setting the right amount of play in your valve train. Think of it like tuning a guitar. Too tight or too loose, and the engine will not sound or run right. The Harley pushrod adjustment chart gives you the exact numbers for your specific engine. Whether you ride a Sportster, a Dyna, or a touring model, there is a chart that matches your setup. Let us dive in and break it all down.
Key Takeaways
- Pushrod adjustment keeps your Harley engine running at peak performance by maintaining correct valve lash.
- The Harley Pushrod Adjustment Chart provides exact measurements for different engine models and years.
- Always warm up your engine before adjusting pushrods for accurate readings.
- Using the wrong tools or specs can cause serious engine damage, so follow the chart carefully.
- Pushrod length varies by engine type, so always check your specific model number.
- Regular pushrod checks prevent expensive repairs down the road.
📑 Table of Contents
- Understanding Your Harley Pushrod System
- How to Read the Harley Pushrod Adjustment Chart
- Step-by-Step Pushrod Adjustment Process
- Common Pushrod Adjustment Mistakes to Avoid
- When to Replace vs. Adjust Your Pushrods
- Pro Tips for Perfect Pushrod Settings
- Benefits of Using the Harley Pushrod Adjustment Chart Regularly
- Conclusion
Understanding Your Harley Pushrod System
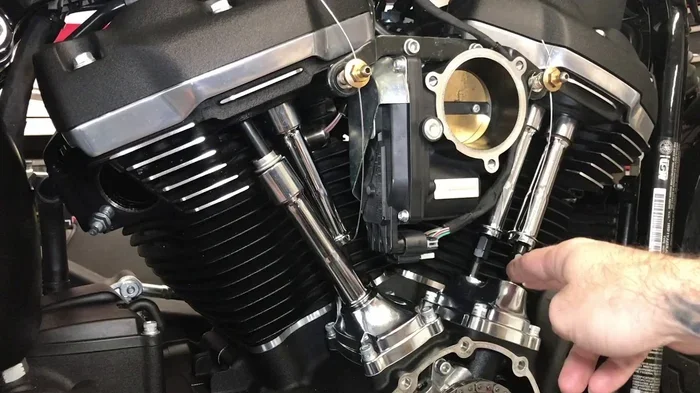
Before you touch that adjustment chart, it helps to understand what pushrods actually do in your Harley engine. The pushrod is a metal rod that connects the camshaft to the rocker arms. When the camshaft spins, it pushes the pushrods up. The pushrods then push the rocker arms, which open the valves. This lets air and fuel into the cylinder and lets exhaust out. It is a simple but vital process.
Over time, parts wear down. The pushrods can stretch slightly. The valve train can develop extra play, which is called valve lash. If valve lash gets too much or too little, your engine will not perform well. You might notice rough idling, poor fuel economy, or even engine damage. This is exactly why the Harley pushrod adjustment chart exists. It tells you the correct valve lash specification for your engine.
How Pushrods Work in Harley Engines
Harley-Davidson engines use a simple but robust overhead valve design. The camshaft sits in the engine block, down low. The pushrods travel up from the camshaft to the cylinder head. At the top, rocker arms transfer the motion to the valves. This design has been used for decades because it is reliable and easy to work on.
Different Harley models use different pushrod lengths. A Sportster pushrod is not the same as a Dyna pushrod. The Harley pushrod adjustment chart accounts for these differences. Always make sure you are looking at the chart for your specific engine model and year. Using the wrong chart can lead to incorrect adjustments and potential engine problems.
Key Components of the Valve Train
Here are the main parts you will encounter when working on pushrod adjustment:
- Camshaft – The spinning shaft with lobes that push the pushrods up and down.
- Pushrods – The long metal rods that transfer motion from the camshaft to the rocker arms.
- Rocker Arms – The levers at the top of the engine that open and close the valves.
- Valves – The intake and exhaust valves that control airflow into and out of the cylinders.
- Tappets – Also called lifters, these sit between the camshaft and pushrods.
- Lock Nuts and Adjusters – These hold the pushrod assembly in place and allow for fine-tuning.
Understanding these parts helps you follow the Harley pushrod adjustment chart more easily. Each component plays a role in getting the valve lash just right.
How to Read the Harley Pushrod Adjustment Chart
The Harley pushrod adjustment chart might look like a wall of numbers at first glance. But once you know what to look for, it is actually quite straightforward. The chart lists your engine model, the type of valve clearance needed, and the procedure for each cylinder.
Finding the Right Chart for Your Model
Not all Harleys use the same pushrod specs. A 2018 Harley Sportster has different numbers than a 2005 Harley Dyna. Here is how to find the right chart:
- Check your owner’s manual. It lists your exact engine model and year.
- Look up the model number on the engine itself. You will find a tag near the cylinder.
- Visit the Harley-Davidson service manual website or your local dealer.
- Match your model and year to the correct Harley pushrod adjustment chart.
Do not guess. Using the wrong chart can cause serious engine damage. Take the extra few minutes to confirm your model number before you start.
Understanding Valve Lash Specifications
Valve lash is the small gap between the rocker arm and the valve tip. The Harley pushrod adjustment chart gives you the exact lash measurement for each valve. For most Harley engines, the intake valve lash is around 0.006 inches, and the exhaust valve lash is around 0.008 inches. But these numbers vary by model.
Here is a quick look at what you might find on a typical chart:
- Intake Valve Clearance – Usually tighter than exhaust. The chart gives the exact number for your engine.
- Exhaust Valve Clearance – Slightly wider to account for heat expansion.
- Cylinder Number – The chart shows which cylinder to adjust and in what order.
- Engine Temperature – Most charts specify the engine should be at normal operating temperature.
The Harley pushrod adjustment chart also tells you whether to adjust on a hot or cold engine. This matters because metal expands when it heats up. Adjusting on the wrong temperature can throw off your settings.
Step-by-Step Pushrod Adjustment Process
Now that you understand the chart, let us walk through the actual adjustment process. This is the hands-on part where your Harley pushrod adjustment chart becomes your best friend.
What You Will Need
Before you start, gather your tools. You do not want to stop halfway through because you are missing something:
- A set of feeler gauges for measuring valve lash
- A wrench set, including the correct size for your adjuster lock nuts
- A screwdriver or Allen key, depending on your model
- The Harley pushrod adjustment chart printed or accessible on a device
- A clean rag and some engine oil
- A motorcycle stand to keep the bike stable
Step 1: Warm Up the Engine
Start your Harley and let it idle for about 10 to 15 minutes. You want the engine to reach normal operating temperature. This ensures the metal parts have expanded to their working size. Adjusting on a cold engine will give you incorrect readings.
Step 2: Locate the Adjustment Points
Open your engine cover and find the rocker arms. Each rocker arm has an adjuster screw. Refer to your Harley pushrod adjustment chart to identify which cylinder to start with. Most Harley service procedures recommend starting with cylinder number one.
Step 3: Find Top Dead Center
Rotate the engine until the piston in cylinder one is at top dead center, or TDC. This is the point where the piston is at its highest position in the cylinder. At TDC, both the intake and exhaust valves for that cylinder should be closed. This is the only position where you can safely adjust the pushrods.
Use your timing light or feel for the alignment marks on the cam sprocket. The Harley pushrod adjustment chart will confirm which marks to look for.
Step 4: Measure Valve Lash
Slide a feeler gauge between the rocker arm and the valve tip. The chart tells you the correct thickness for the feeler gauge. Try the gauge in and out. You want a slight, consistent drag. If it slides in too easily, the lash is too loose. If it does not fit at all, the lash is too tight.
Step 5: Adjust the Pushrod
Use a screwdriver or wrench to turn the adjuster screw. Turn it slowly and check the feeler gauge repeatedly. Once you feel the right amount of drag, hold the adjuster steady and tighten the lock nut. Do not let the adjuster move while you tighten the nut.
Step 6: Repeat for All Cylinders
Rotate the engine to the next cylinder and repeat the process. The Harley pushrod adjustment chart tells you the order and the correct lash for each valve. Work through all cylinders one by one until every valve is set correctly.
Step 7: Reassemble and Test Ride
Put the engine cover back on and start the engine. Listen for any unusual sounds. A properly adjusted engine should idle smoothly and evenly. Take a short test ride and pay attention to how the bike feels. Smooth power delivery means you did the job right.
Common Pushrod Adjustment Mistakes to Avoid
Even experienced riders make mistakes when adjusting pushrods. Here are the most common errors and how to avoid them.
Mistake 1: Guessing the Valve Lash
Never guess the valve lash. Always use the Harley pushrod adjustment chart and a feeler gauge. Guessing can lead to valves that are too tight or too loose. Tight valves can cause the engine to lose power. Loose valves can cause noise and poor performance.
Mistake 2: Adjusting on a Cold Engine
As mentioned earlier, always adjust on a warm engine. Metal expands with heat. If you set the lash on a cold engine, the numbers will be off once the engine warms up. This can cause all kinds of running problems.
Mistake 3: Using the Wrong Chart for Your Model
Not all Harleys are the same. A chart for a 2015 Sportster will not work for a 2020 Road King. Always double-check that you are using the Harley pushrod adjustment chart for your specific model and year. Mixing up the charts is a costly mistake.
Mistake 4: Over-Tightening the Lock Nut
When you tighten the lock nut after adjusting, be careful. Over-tightening can strip the threads or damage the adjuster. Use the correct size wrench and tighten to the torque specification listed in your service manual.
Mistake 5: Skipping the TDC Check
Never adjust a pushrod without confirming the piston is at top dead center. If you adjust at the wrong point, the valves will be open, and you could bend them. Always verify TDC before you start each cylinder.
When to Replace vs. Adjust Your Pushrods
Sometimes adjusting is not enough. Knowing when to replace your pushrods instead of just adjusting them is important for long-term engine health.
Signs You Need New Pushrods
Watch for these warning signs:
- Pushrods that are visibly bent or warped – This happens from engine contact or severe valve issues.
- Pushrods that are stretched beyond the adjustment range – If you cannot achieve the correct lash even with the adjuster fully extended, the pushrod is too long.
- Engine running rough even after adjustment – Worn pushrods can cause persistent valve train noise and poor performance.
- Visible scoring or wear on the pushrod surface – Check the pushrods during a valve job. Any signs of damage mean replacement time.
The Harley pushrod adjustment chart helps you determine if your pushrods are still within spec. If the numbers do not add up even with the adjuster at its limits, it is time for new pushrods.
Choosing the Right Replacement Pushrods
If you need to replace your pushrods, make sure you get the correct length and diameter for your engine. Aftermarket pushrods are available, but always check the specs against the Harley pushrod adjustment chart. OEM pushrods from Harley-Davidson are the safest bet for matching your original engine specifications.
Pro Tips for Perfect Pushrod Settings
Here are some expert tips to help you get the best results every time you work on your pushrods.
Tip 1: Take Your Time
Rushing through pushrod adjustment is the fastest way to make a mistake. Set aside a quiet afternoon with no distractions. Work through each cylinder carefully and methodically. The Harley pushrod adjustment chart is your guide, but your patience is what ensures accuracy.
Tip 2: Keep a Log
Write down the measurements and adjustments you make for each cylinder. This creates a record you can refer back to. If something goes wrong later, you will have a log to help you troubleshoot.
Tip 3: Use Quality Tools
A cheap feeler gauge set can give you false readings. Invest in a quality set that measures accurately. Your Harley pushrod adjustment chart depends on precise measurements. The better your tools, the better your results.
Tip 4: Check the Chart Every Time
Even if you have done this job before, always refer to the chart again. Engine specifications can change between model years. What worked for your 2010 model may not be correct for your 2022 model.
Tip 5: Do a Full Valve Train Inspection
While you are in there adjusting pushrods, take the time to inspect the entire valve train. Look for worn rocker arms, damaged valve springs, or carbon buildup on the valve tips. Catching small problems early saves you from big repair bills later.
Benefits of Using the Harley Pushrod Adjustment Chart Regularly
Making pushrod adjustment part of your regular maintenance routine has many benefits. Your engine will run smoother, sound better, and last longer. Proper valve lash improves fuel efficiency and power delivery. It also reduces wear on the valve train components.
Using the Harley pushrod adjustment chart regularly gives you confidence in your bike’s reliability. You will notice the difference in how the engine idles, how it responds to throttle, and how it sounds on the open road. It is one of those simple maintenance tasks that makes a big difference over time.
For riders who enjoy working on their own bikes, mastering pushrod adjustment is a rite of passage. It connects you more deeply with your machine and gives you a better understanding of how your Harley engine works. The Harley pushrod adjustment chart is the tool that makes all of this possible.
Conclusion
Adjusting your Harley pushrods does not have to be scary. With the right Harley Pushrod Adjustment Chart, a few basic tools, and a little patience, you can do this job yourself. The chart gives you the exact numbers you need for your specific engine model. Follow the steps carefully, avoid the common mistakes, and take your time. Your Harley will reward you with smoother running, better performance, and fewer expensive trips to the mechanic.
Remember, pushrod adjustment is not a one-time job. Check your pushrods regularly as part of your routine maintenance. Keep your chart handy, and do not hesitate to refer back to it whenever you work on your valve train. A well-maintained Harley is a happy Harley, and that means more miles of riding enjoyment for you.
Now that you know how to read and use the Harley pushrod adjustment chart, you have the skills to keep your engine in top shape. Grab your tools, pull up the chart, and give your Harley the care it deserves. Your bike will thank you every time you twist the throttle.
Frequently Asked Questions
What is the Harley Pushrod Adjustment Chart used for?
The Harley Pushrod Adjustment Chart provides the correct valve lash specifications for different Harley engine models. It tells you the exact clearance needed for each intake and exhaust valve so your engine runs smoothly and efficiently.
How often should I adjust my Harley pushrods?
Most Harley owners should check their pushrod adjustment every 5,000 to 10,000 miles. However, if you notice rough idling, valve noise, or poor performance, check them sooner. Regular use of the Harley pushrod adjustment chart during these checks keeps your engine in great shape.
Can I adjust my pushrods without a feeler gauge?
No. A feeler gauge is essential for measuring valve lash accurately. Guessing the clearance can lead to engine damage. Always use the Harley pushrod adjustment chart alongside a quality feeler gauge set for reliable results.
What happens if my pushrods are adjusted too tight?
Overly tight pushrods cause the valves to stay partially open. This leads to poor engine performance, overheating, and potential valve damage. Always follow the Harley pushrod adjustment chart to ensure the correct valve lash for your engine.
Are pushrod adjustment charts different for Harley models?
Yes. Different Harley models use different pushrod lengths and valve lash specifications. The Harley pushrod adjustment chart is model-specific. Always use the chart that matches your exact engine model and year.
Is pushrod adjustment hard for beginners?
Not at all. With the Harley pushrod adjustment chart as your guide and a basic tool set, beginners can learn to adjust pushrods in an afternoon. The key is to take your time, follow each step carefully, and never skip the TDC check.