How Do You Uncap Gas Without Any Hassle Or Stress At All
Wondering how do you uncap gas quickly and safely? This complete guide walks you through every method, from simple twists to handling stubborn stuck caps. You will learn the right tools, common mistakes to avoid, and when to replace your gas cap for better fuel economy and engine performance.
Have you ever pulled up to a gas station and felt that tiny moment of panic? You know the one. You grab for the fuel door, but something feels off. Maybe the gas cap is stuck. Maybe you forgot how it opens. Maybe it just refuses to budge no matter how hard you try.
Here is the good news. How do you uncap gas is a simpler question than most people think. Whether your cap twists open with one hand or fights you like a rusty lid on a pickle jar, there is a solution. This guide covers everything you need to know.
We will walk through the basic steps, troubleshoot stuck caps, discuss replacement options, and share tips that keep your fuel tank sealed tight. By the end, you will never second-guess yourself at the pump again.
Let us get into it. No stress. No hassle. Just clear, practical advice that works every time.
Key Takeaways
- Know your gas cap type: Different vehicles use different cap styles, and knowing yours makes uncapping faster.
- Turn left to loosen: Most gas caps twist counterclockwise to open. It is that simple.
- Use a cap wrench for stuck caps: A specialized tool saves your hands and prevents damage.
- Check the seal and gasket: A worn gas cap gasket causes fuel vapor leaks and poor mileage.
- Replace when needed: A damaged cap can trigger your check engine light and hurt fuel system health.
- Listen for the click: A properly tightened cap clicks 1 to 3 times after tightening.
- Never force it: Forcing a stuck cap can break the mechanism and lead to costly gas cap repair.
📑 Table of Contents
- What Is a Gas Cap and Why Does It Matter?
- Common Reasons You Need to Uncap Your Gas Tank
- Step-by-Step Guide on How Do You Uncap Gas
- When Your Gas Cap Is Stuck or Won’t Budge
- How to Replace Your Gas Cap the Right Way
- Gas Cap Maintenance Tips for Long-Lasting Performance
- Common Mistakes People Make With Their Gas Caps
- How Do You Uncap Gas in Special Situations
- Conclusion
What Is a Gas Cap and Why Does It Matter?
Your gas cap is more than a tiny lid on your fuel tank. It is a critical part of your vehicle’s evaporative emissions system. Also known as the EVAP system, this setup prevents fuel vapor from escaping into the air. That protects both the environment and your fuel economy.
A good gas cap does three important jobs:
- Seals the fuel tank to prevent vapor leaks.
- Maintains pressure inside the fuel system for smooth engine performance.
- Triggers the check engine light if it is loose, damaged, or missing.
When your gas cap works properly, you get better mileage and fewer trips to the mechanic. When it does not work, you can face serious problems. A loose or broken cap can reduce fuel economy by up to 2%. That might sound small, but over a year of driving, it adds up fast.
Understanding your gas cap is the first step toward mastering how to open and close it correctly. Let us move on to the most common ways caps are designed.
Types of Gas Caps You Will Encounter
Not all gas caps are the same. Different vehicles use different styles. Here are the most common types you will see on the road today.
- Standard screw-on caps: These twist off and on. They are the most common type found on older and many newer vehicles.
- Push-and-turn caps: You push down and twist at the same time. These are common on modern cars with keyless fuel systems.
- Spring-loaded caps: These have a built-in spring mechanism that clicks when sealed properly.
- Remote-release caps: Some vehicles open the fuel door from the cabin using a button or lever.
Knowing which type your vehicle uses makes the whole process of uncapping gas much easier. Check your owner manual if you are unsure.
Common Reasons You Need to Uncap Your Gas Tank
There are many situations where you need to open your gas cap. Some are routine. Others are less common but equally important.
Refueling Your Vehicle
The most obvious reason is simply adding fuel. You pull into a gas station, locate your fuel door, and need to access the tank. This happens every few days for most drivers, and it should be quick and easy.
Replacing a Damaged Cap
Over time, gas caps wear out. The rubber gasket inside can crack. The internal seal can degrade. When that happens, the cap no longer creates a proper seal. You will need to replace it, which means removing the old one first.
Troubleshooting Warning Lights
A loose or faulty gas cap is one of the top reasons for a check engine light. If your dashboard shows a warning, the first thing to check is your fuel cap. Sometimes just removing it, reseating it, and tightening it properly clears the warning.
Cleaning or Inspecting the Fuel Neck
Debris, dirt, and even ice can build up around the fuel neck. Periodically removing the gas cap allows you to inspect and clean the area. This simple maintenance step prevents blockages and keeps your fuel system running smoothly.
Step-by-Step Guide on How Do You Uncap Gas
Now let us get to the heart of the matter. Here is exactly how to uncap your gas the right way, no matter what type of vehicle you drive.
Step 1: Park on Level Ground and Turn Off the Engine
Safety first. Pull your vehicle to a flat surface and switch the engine off. Do not add fuel while the engine is running. This reduces the risk of fire and ensures the fuel system is at rest. Wait a few moments for any fuel vapor pressure to settle.
Step 2: Locate the Fuel Door
Look at the side of your vehicle. The fuel door is usually on the rear quarter panel, either left or right. Some vehicles have a small handle or button on the dashboard or door panel that releases it. Push or pull that release to pop the door open.
If your vehicle does not have a remote release, go to the outside of the car and look for a small latch or flip-style door on the fuel door itself.
Step 3: Remove the Gas Cap
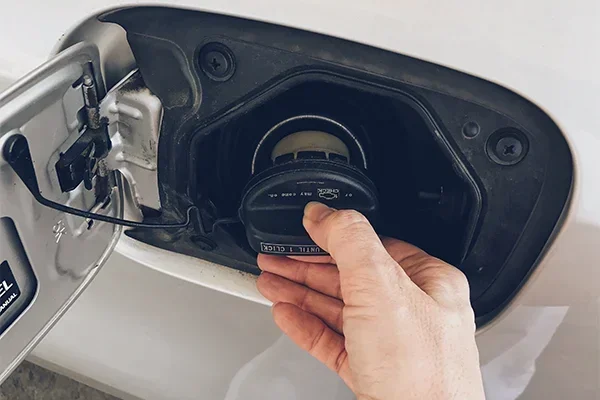
Now comes the moment. Grab the gas cap and turn it counterclockwise. Most standard caps require a quarter turn to release. You may hear a slight hiss of air. That is normal. It is just the release of fuel system pressure.
For push-and-turn style caps, press down firmly and twist simultaneously. The cap will pop free once the locking mechanism disengages.
Set the cap somewhere safe. Do not place it on the ground where it can get dirty or rolled away. Many vehicles have a small hook or holder inside the fuel door specifically for this purpose.
Step 4: Inspect the Cap and Neck
With the cap removed, take a quick look at both the cap and the fuel neck. Check for any dirt, debris, or damage to the rubber gasket on the underside of the cap. Wipe both surfaces clean with a dry cloth before reattaching or replacing.
Step 5: Add Fuel and Reattach the Cap
After refueling, place the gas cap back onto the fuel neck and turn it clockwise until it clicks. Most caps require 2 to 3 clicks to fully seal. Do not overtighten. Forcing it can damage the threading or the seal.
Close the fuel door and you are all set. Drive away with confidence.
When Your Gas Cap Is Stuck or Won’t Budge
Sometimes the gas cap just will not move. This is more common than you might think. Cold weather, rust, and old age all contribute to a stuck cap. Here is what to do when simple twisting does not work.
Why Gas Caps Get Stuck
Several factors can cause a gas cap to seize up:
- Corrosion and rust: Exposure to road salt, moisture, and debris causes metal parts to corrode over time.
- Vacuum pressure: After fueling, a vacuum can form inside the tank. This creates extra resistance when trying to open the cap.
- Frozen gasket: In cold climates, moisture around the gasket can freeze, gluing the cap in place.
- Over-tightening: If you have been cranking the cap down too hard, the threads can bind up.
- Worn internal parts: The spring or locking mechanism inside the cap can wear out with age.
How to Free a Stuck Gas Cap
Do not panic. Do not use excessive force. Here is a calm, step-by-step approach to getting a stuck cap loose.
- Wait a few minutes. Sometimes the vacuum just needs a moment to equalize. Tap the cap gently with your palm and try again.
- Try pressing down while turning. Many caps need downward pressure to release the locking pin. Push firmly and twist counterclockwise at the same time.
- Use a rubber grip or strap. A rubber jar opener or a wide rubber band wrapped around the cap gives you extra grip and torque without scratching the surface.
- Apply gentle heat. In cold weather, warm the cap with a hair dryer or warm cloth. Do not use direct flame or boiling water. Heat expands the metal and can break the seal of any ice or corrosion.
- Use a cap wrench. A cap wrench is a simple tool designed specifically for this purpose. It fits over the cap and gives you the leverage you need without damaging the finish.
If none of these methods work, the cap may need to be replaced entirely. In that case, removing the entire gas cap assembly from the fuel neck might be necessary. A mechanic can help with this if you are uncomfortable doing it yourself.
Expert Insight
Automotive specialists recommend keeping a cap wrench in your glove box. It takes up almost no space and can save you from a frustrating experience at the worst possible moment. A small investment that pays off big time.
How to Replace Your Gas Cap the Right Way
Sometimes uncapping gas is the easy part. The real question becomes when and how to replace a worn-out gas cap. A damaged cap can cause fuel vapor leaks, reduce fuel economy, and even trigger your check engine light.
Signs Your Gas Cap Needs Replacement
Watch for these warning signs:
- The check engine light comes on shortly after fueling.
- You smell fuel vapors near the rear of the vehicle.
- The cap does not click when tightened, or it clicks but still feels loose.
- The rubber gasket is visibly cracked, dry, or damaged.
- The cap is visibly corroded or the threads are stripped.
- Your fuel economy has dropped noticeably for no clear reason.
Choosing the Right Replacement Cap
Not every gas cap fits every vehicle. Here is what to consider when buying a replacement.
- Check the part number: Your owner manual lists the correct gas cap specification. Match the part number exactly.
- Consider the type: Choose between standard screw-on, push-and-turn, or remote-release based on your vehicle’s design.
- Look for OEM or certified aftermarket: Original Equipment Manufacturer caps meet your vehicle’s exact specifications. Certified aftermarket options are also reliable and often more affordable.
- Check the seal material: Rubber gaskets come in different compounds. Some resist heat better, while others are more flexible in cold weather.
Installing the New Gas Cap
Installation is simple. Remove the old cap by turning it counterclockwise. Clean the fuel neck threads with a dry cloth. Thread the new cap on by hand and turn it clockwise until it clicks 2 to 3 times. Do not use tools to overtighten a gas cap. Hand tight is always the right tight.
After installation, drive for a few miles and watch your dashboard. If the check engine light does not return, your new gas cap is doing its job perfectly.
Gas Cap Maintenance Tips for Long-Lasting Performance
Your gas cap does not need much attention, but a little care goes a long way. Follow these simple maintenance tips to keep your fuel system in great shape.
Clean the Cap Regularly
Wipe down your gas cap with a damp cloth every few weeks. Remove any dirt, grime, or fuel residue from the exterior and the threads. A clean cap seals better and lasts longer. Pay special attention to the rubber gasket. Wipe it gently to remove any buildup that could prevent a tight seal.
Inspect the Gasket Monthly
Once a month, remove the cap and check the rubber gasket. Look for cracks, hardening, or flattening. A healthy gasket is flexible and slightly pliable. If it feels stiff or looks damaged, replace the cap immediately. A worn gasket is the number one cause of fuel vapor leaks.
Always Tighten by Hand
Never use pliers, wrenches, or other tools to tighten your gas cap unless you are using a proper cap wrench for removal. Overtightening strips the threads, warps the seal, and can crack the cap body. Hand tight with 2 to 3 clicks is all it takes.
Keep a Spare Cap in Your Garage
Gas caps are inexpensive and easy to lose. Keep a spare in your garage or trunk. If your cap goes missing or breaks, having a replacement on hand saves you a trip to the auto parts store and keeps your fuel system sealed properly.
Quick Tips
- Always open your gas cap before pumping fuel to release any pressure.
- Do not leave the cap off for longer than necessary. Exposing the fuel tank to air invites moisture and contaminants.
- If your check engine light comes on after fueling, try removing and re-tightening the cap first. It solves the problem more often than you would think.
- Replace your gas cap every 3 to 5 years as a preventive measure, even if it still looks fine.
Common Mistakes People Make With Their Gas Caps
Even though uncapping gas seems straightforward, people still make mistakes. Here are the most common ones and how to avoid them.
- Forcing a stuck cap: This is the number one mistake. Forcing a gas cap that is stuck can break the internal mechanism, damage the fuel neck threads, or crack the cap body. Always try gentle methods first.
- Overtightening the cap: Many people believe cranking the cap down extra tight creates a better seal. It does not. It actually damages the seal and makes future removal harder.
- Driving with a loose cap: A loose gas cap lets fuel vapor escape. This triggers the check engine light and wastes fuel. Always listen for the click.
- Using the wrong cap: Every vehicle has a specific gas cap design. Using an incompatible cap can cause leaks, poor sealing, and EVAP system errors.
- Ignoring warning signs: If you notice fuel odors, a loose-feeling cap, or a check engine light, do not ignore it. Address gas cap issues promptly to avoid bigger problems down the road.
How Do You Uncap Gas in Special Situations
Not every fueling situation is the same. Here is how to handle uncapping gas in a few special scenarios.
Uncapping Gas in Cold Weather
Cold weather is the enemy of gas caps. Ice and frost can form around the seal, making the cap nearly impossible to open. If you face this situation, do not pour hot water on the cap. The sudden temperature change can crack the plastic or damage the seal. Instead, use a warm cloth or your vehicle’s defroster to gently warm the area. Once the ice melts, the cap should turn freely.
Uncapping Gas After a Long Drive
After driving for a long time, the fuel system builds up pressure. You may hear a hissing sound when you first try to open the cap. Wait a moment for the pressure to equalize. Press the cap down firmly and turn it slowly. The hissing should stop once the vacuum releases.
Uncapping Gas on a Vehicle with a Keyless Fuel System
Many modern vehicles use electronic keyless fuel systems. In these cars, you may need to press a button inside the cabin to release the fuel door. The gas cap itself often has a spring-loaded push mechanism. Simply push the cap inward and twist it counterclockwise. It releases with very little force. These systems are designed for convenience and ease of use.
Conclusion
So, how do you uncap gas without any hassle or stress? The answer is simpler than most people expect. Know your cap type. Follow the basic steps. Use the right tools when needed. And never force a cap that is fighting you.
Your gas cap is a small but mighty part of your vehicle. It protects your fuel system, improves fuel economy, and keeps harmful fuel vapor out of the atmosphere. Taking care of it takes only seconds but pays off for years.
Whether you are a first-time driver or someone who has been fueling up for decades, these tips will help you handle your gas cap with confidence. Keep a cap wrench in your glove box, inspect your gasket regularly, and replace your cap when it shows signs of wear.
The next time you pull up to the pump, you will know exactly what to do. No stress. No hassle. Just a quick twist and you are on your way. Happy fueling.
Frequently Asked Questions
Can a loose gas cap cause a check engine light?
Yes, absolutely. A loose or improperly sealed gas cap is one of the most common reasons for a check engine light. The vehicle’s EVAP system detects a leak in the fuel system and triggers the warning. Tightening the cap or replacing it often resolves the issue within a few drive cycles.
How tight should I tighten my gas cap?
Hand tight is perfect. Turn the cap clockwise until you hear 2 to 3 clicks. There is no need to use tools or extra force. Overtightening can damage the seal and make future removal difficult. A gentle click or two is all you need for a proper seal.
How often should I replace my gas cap?
Most automotive experts recommend replacing your gas cap every 3 to 5 years. The rubber gasket inside the cap degrades over time from exposure to heat, fuel vapors, and weather. Even if the cap looks fine on the outside, the internal seal may be worn. Regular replacement prevents fuel vapor leaks and protects your fuel economy.
What should I do if my gas cap is missing?
Do not drive long distances without a gas cap. A missing cap allows fuel vapor to escape, which can trigger the check engine light and reduce fuel economy. You can drive a short distance to the nearest auto parts store to buy a replacement. Most stores carry universal-fit caps that work with a wide range of vehicles.
Does the type of gas cap affect fuel economy?
Yes, it can. A properly sealed gas cap prevents fuel vapor from escaping the fuel tank. When the seal is damaged or the cap is missing, your vehicle can lose fuel through evaporation. Over time, this adds up and reduces your overall fuel economy. Replacing a worn cap is one of the cheapest ways to improve mileage.
Is it safe to drive with the gas cap light on?
It is generally safe for a short distance, but you should address it quickly. The gas cap light usually means the cap is loose, damaged, or missing. While the vehicle will still run, you may notice reduced performance or a slight fuel odor. Stop and check the cap as soon as it is safe to do so. Reseating or replacing the cap usually turns the light off within a few miles of driving.